Hamid Zarringhalam
Geovis Project Assignment, TMU Geography, SA8905, Fall 2025
Welcome to Hamid Zarringhalam’s blog!
In this blog, I present a tutorial for the app that I developed to visualize near real time global earthquake data.

Introduction
In an increasingly data driven world, the ability to visualize complex spatial information in real time is essential for decision making, analysis, and public engagement. This application leverages the power of D3.js, a dynamic JavaScript library for data-driven documents, and Leaflet.js, a lightweight open-source mapping library, to create an interactive real-time visualization map.
By combining D3’s flexible data binding and animation capabilities with Leaflet’s intuitive map rendering and geospatial tools, the application enables users to explore live data streams activity and directly on a geographic interface.
The goal is to provide a responsive and visually compelling platform that not only displays data but also reveals patterns, trends, and anomalies as they unfold.
Data Sources
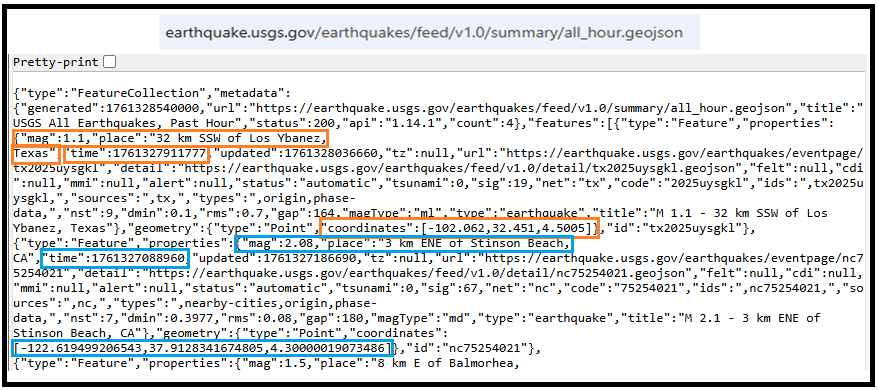
The USGS.gov provides scientific data about natural hazards, the health of our ecosystems and environment, and collects a massive amount of data from all over the world all the time. It provides earthquake data in several formats and updated every 5 minutes.
Here is the link to USGS GeoJSON Feeds: “http://earthquake.usgs.gov/earthquakes/feed/v1.0/geojson.php”
When you click on a data set, for example ‘All Earthquakes from the Past 7 Days’, you will be given a JSON representation of that data. You will be using the URL of this JSON to pull in the data for the visualization. Included popups that provide additional information about the earthquake when a marker is clicked.
For example: “https://earthquake.usgs.gov/earthquakes/feed/v1.0/summary/all_hour.geojson” contains different objects that show different earthquakes.
The Approach
Real-time GeoJSon online earthquake data will be fetched from USGS. These Data will be processed through D3.js functions and will be displays as circle markers on different map using MapBox API, styled by magnitude and grouped by time intervals and create a map using Leaflet that plots all of the earthquakes from your data set based on their longitude and latitude.
There are three files that are created and used in this application
- HTML file that creates a web-based earthquake visualization tool. It loads a Leaflet map and uses JavaScript (via D3 and Leaflet) to fetch and display real-time earthquake data with interactive markers.
- Styles for style the map with CSS
- Java script which creates an interactive web map that visualizes real-time earthquake data from the USGS (United States Geological Survey) using Leaflet.js and D3.js.
Leaflet in the script is used to create an interactive, web-based map that visualizes earthquake data in a dynamic and user-friendly way. Leaflet provides the core functionality to render a map.
Leaflet is JavaScript library and great for displaying data, but it doesn’t include built-in tools for fetching or manipulating external data.
D3.js in this script is used to fetch and process external data specifically, the GeoJSON earthquake feeds from the USGS, and Popups, color and Circlemarker will be called in D3.js
Steps of creating interactive maps
Step 1. Creating the frame for the visualization using HTML
HTML File:
<html lang=”en”>
<head>
<meta charset=”UTF-8″>
<meta name=”viewport” content=”width=device-width, initial-scale=1.0″>
<meta http-equiv=”X-UA-Compatible” content=”ie=edge”>
<title>Leaflet Step-2</title>
<!– Leaflet CSS –>
<link rel=”stylesheet” href=”https://unpkg.com/leaflet@1.6.0/dist/leaflet.css”
integrity=”sha512-xwE/ Az9zrjBIphAcBb3F6JVqxf46+CDLwfLMHloNu6KEQCAWi6HcDUbeOfBIptF7tcCzus KFjFw2yuvEpDL9wQ==”
crossorigin=”” />
<!– Our CSS –>
<link rel=”stylesheet” type=”text/css” href=”static/css/style.css”>
</head>
<body>
<!– The div that holds our map –>
<div id=”map”></div>
<!– Leaflet JS –>
<script src=”https://unpkg.com/leaflet@1.6.0/dist/leaflet.js”
integrity=”sha512-rVkLF/ 0Vi9U8D2Ntg4Ga5I5BZpVkVxlJWbSQtXPSiUTtC0TjtGOmxa1AJPuV0CPthew==”
crossorigin=””></script>
<!– D3 JavaScript –>
<script type=”text/javascript” src=”https://cdnjs.cloudflare.com/ajax/libs/d3/4.2.3/d3.min.js”></script>
<!– API key –>
<script type=”text/javascript” src=”static/js/config.js”></script>
<!– The JavaScript –>
<script type=”text/javascript” src=”static/js/logic2.js”></script>
</body>
</html>
Step 2. Fetching Earthquake Data
This section of the App defines four URLs from USGS and assigns them to four variables:
Js codes for fetching the data from USGS:
var earthquake1_url = “https://earthquake.usgs.gov/earthquakes/feed/v1.0/summary/all_hour.geojson”
var earthquake2_url = “https://earthquake.usgs.gov/earthquakes/feed/v1.0/summary/all_day.geojson”
var earthquake3_url = “https://earthquake.usgs.gov/earthquakes/feed/v1.0/summary/all_week.geojson”
var earthquake4_url = “https://earthquake.usgs.gov/earthquakes/feed/v1.0/summary/all_month.geojson”
Step 3. Processing the data
D3.js is used for processing the data. Leaflet CircleMarker library and Color function will be called in this D3.js
Js codes for processing the data:
var earthquake3 = new L.LayerGroup();
//Here is the code for gathering the data when user chooses the 3rd option which is //all week earthquake information
d3.json(earthquake3_url, function (geoJson) {
//Create Marker
L.geoJSON(geoJson.features, {
pointToLayer: function (geoJsonPoint, latlng) {
return L.circleMarker(latlng, { radius: markerSize(geoJsonPoint.properties.mag) });
},
style: function (geoJsonFeature) {
return {
fillColor: Color(geoJsonFeature.properties.mag),
fillOpacity: 0.7,
weight: 0.1,
color: ‘black’
}
},
// Add pop-up with related information
onEachFeature: function (feature, layer) {
layer.bindPopup(
“<h4 style=’text-align:center;’>” + new Date(feature.properties.time) +
“</h4> <hr> <h5 style=’text-align:center;’>” + feature.properties.title + “</h5>”);
}
}).addTo(earthquake3);
createMap(earthquake3);
});
Step 4. Creating proportional Circle Markers
The circle markers reflect the magnitude of the earthquake. Earthquakes with higher magnitudes appear larger and darker in color.
The circle marker Leaflet library is called in above D3.js code. Uses Color(magnitude) to assign color based on the magnitude:
Function Color(magnitude) { different color for different size of Magnitude}
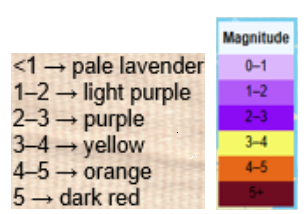
Function Color odes:
This function creates different colors for different magnitudes. This function will be called by D3.js and is highlighted in above code.
function Color(magnitude) {
if (magnitude > 5) {
return “#6E0C21”;
} else if (magnitude > 4) {
return “#e76818”;
} else if (magnitude > 3) {
return “#F6F967”;
} else if (magnitude > 2) {
return “#8B0BF5”;
} else if (magnitude > 1) {
return “#B15AF8”;
} else {
return ‘#DCB6FC’
}
};
Step 5. Mapping the information using MapBox API
By choosing a different tile a different base map will be visualized, and it is through API to MapBox.
var baseLayers = {
“Tiles”: tiles,
“Satellite”: satellite,
“Terrain-RGB”: terrain_rgb,
“Terrian”: Terrian
};
Code for choosing the selected title through API to MapBox:
function createMap() {
// Tile layer (initial map) whhich comes from map Box
var tiles = L.tileLayer(“https://api.mapbox.com/styles/v1/{id}/tiles/{z}/{x}/{y}?access_token={accessToken}”, {
attribution: “© <a href=’https://www.mapbox.com/about/maps/’>Mapbox</a> © <a href=’http://www.openstreetmap.org/copyright’>OpenStreetMap</a> <strong><a href=’https://www.mapbox.com/map-feedback/’ target=’_blank’>Improve this map</a></strong>”,
tileSize: 512,
maxZoom: 18,
zoomOffset: -1,
id: “mapbox/streets-v11”,
accessToken: API_KEY
});
var satellite = L.tileLayer(‘https://api.tiles.mapbox.com/v4/{id}/{z}/{x}/{y}.png?access_token={accessToken}’, {
attribution: ‘Map data © <a href=\”https://www.openstreetmap.org/\”>OpenStreetMap</a> contributors, <a href=\”https://creativecommons.org/licenses/by-sa/2.0/\”>CC-BY-SA</a>, Imagery © <a href=\”https://www.mapbox.com/\”>Mapbox</a>’,
maxZoom: 13,
// Type of map box
id: ‘mapbox.satellite’,
accessToken: API_KEY
});
var terrain_rgb = L.tileLayer(‘https://api.mapbox.com/v4/mapbox.terrain-rgb/{z}/{x}/{y}.png?access_token={accessToken}’, {
attribution: ‘Map data © <a href=\”https://www.openstreetmap.org/\”>OpenStreetMap</a> contributors, <a href=\”https://creativecommons.org/licenses/by-sa/2.0/\”>CC-BY-SA</a>, Imagery © <a href=\”https://www.mapbox.com/\”>Mapbox</a>’,
maxZoom: 13,
// Type of map box
id: ‘mapbox.outdoors’,
accessToken: API_KEY
});
var Terrian = L.tileLayer(‘https://api.mapbox.com/v4/mapbox.mapbox-terrain-v2/{z}/{x}/{y}.png?access_token={accessToken}’, {
attribution: ‘Map data © <a href=\”https://www.openstreetmap.org/\”>OpenStreetMap</a> contributors, <a href=\”https://creativecommons.org/licenses/by-sa/2.0/\”>CC-BY-SA</a>, Imagery © <a href=\”https://www.mapbox.com/\”>Mapbox</a>’,
maxZoom: 13,
// Type of map box
id: ‘mapbox.Terrian’,
accessToken: API_KEY
});
How to install and run the application
- Request an API Key from MapBox at API Docs | Mapbox
- Unzip the app.zip file
- Add your API Key to the config.js file under “static/js” folder
- Double-click on HTML file
- Click on layer icon and choose the Tile and the period that earthquake happened
- Click on any of the proportional circle to see more information about each earthquake
Overcoming Challenge(s)
Creating a D3.json() for real time interaction with USGS needed more work. I could make it work after reading more about D3 and finding about other examples.
Key Insights
- Monitoring seismic activity in near real-time
- Compare earthquake patterns across different timeframes
- Understand magnitude distribution visually
Conclusion
The real time interactive map provides end users with timely, accurate information, making it both highly beneficial and informative. It also serves as a powerful tool for visualizing big data and supporting effective decision making.


 .
.


 the top 15 recipients I liked the idea of an interactive dashboard. This would allow the user to hover over a country and see a breakdown by food category. For example, North Korea received 372,555 mt of food in 2012 and all deliveries were for emergency purposes.


