3D Approach to Visualizing Crime on Campus: Laser-Cut Acrylic Hexbins

By: Lindi Jahiu

Geovis Project Assignment @RyersonGeo, SA8905, Fall 2021

INTRODUCTION

Crime on campus has long been at the forefront of discussion regarding safety of community members occupying the space. Despite efforts to mitigate the issue—vis-à-vis increased surveillance cameras, increased hiring of security personnel, etc.—, it continues to persist on X University’s campus. In an effort to quantify this phenomenon, the university’s website collates each security incident that takes place on campus and details its location, time (reported and occurrence), and crime type, and makes it readily available for the public to view through web browser or email notifications. This effort to collate security incidents can be seen as a way for the university to first and foremost, quickly notify students of potential harm, but also as a means to understanding where incidents may be clustering. The latter is to be explored in the subsequent geo-visualization project which attempts to visualize three years worth of security incidents data, through the creation of a 3D laser-cut acrylic hexbin model. Hexbinning refers to the process of aggregating point data into a predefined hexagon that represents a given area, in this case, the vertex-to-vertex measurement is 200 metres. By proxy of creating a 3D model, it is hoped that the tangibility, interchangeability, and gamified aspects of the project will effectively re-conceptualize the phenomena to the user, and in-turn, stress the importance of the issue at hand. 

DATA AND METHODS

The data collection and methodology can be divided into two main parts: 2D mapping and 3D modelling. For the 2D version, security incidents from July 2nd, 2018 to October 15th, 2021 were manually scraped from the university’s website (https://www.ryerson.ca/community-safety-security/security-incidents/list-of-security-incidents/) and parsed into columns necessary for geocoding purposes (see Figure 1). Once all the data was placed into the excel file, they would be converted into a .csv file and imported into the ArcGIS Pro environment. Once there, one simply right clicks on the .csv and clicks “Geocode Table”, and follows the prompts for inputting the data necessary for the process (see inputs in Figure 2). Once ran, the geocoding process showed a 100% match, meaning there was no need for any alterations, and now shows a layer displaying the spatial distribution of every security incident (n = 455) (see Figure 3). To contextualize these points, a base map of the streets in-and-around the campus was extracted from the “Road Network File 2016 Census” from Scholars GeoPortal using the “Split Line Features” tool (see output in Figure 3). 

Figure 1. Snippet of spreadsheet containing location, postal code, city, incident date, time of incident, and crime type, for each of the security incidents.

Figure 2. Inputs for the Geocoding table, which corresponds directly to the values seen in Figure 1.

Figure 3. Base map of streets in-and-around X University’s campus. Note that the geo-coded security incidents were not exported to .SVG – only visible here for demonstration purposes.

To aggregate these points into hexbins, a certain series of steps had to be followed. First, a hexagonal tessellation layer was produced using the “Generate Tessellation” tool, with the security incidents .shp serving as the extent (see snippet of inputs in Figure 4 and output in Figure 5). Second, the “Summarize Within” tool was used to count the number of security incidents that fell within a particular polygon (see snippet of inputs in Figure 6 and output in Figure 7). Lastly, the classification method applied to the symbology (i.e. hexbins) was “Natural Breaks”, with a total of 5 classes (see Figure 7). Now that the two necessary layers have been created, namely, the campus base map (see Figure 3 – base map along with scale bar and north arrow) and tessellation layer (see Figure 5 – hexagons only), they would both be exported as separate images to .SVG format – a format compatible with the laser cutter. The hexbin layer that was classified will simply serve as a reference point for the 3D model, and was not exported to .SVG (see Figure 7).

Figure 4. Snippet of input when using the “Generate Tessellation” geoprocessing tool. Note that these were not the exact inputs, spatial reference left blank merely to allow the viewer to see what options were available.

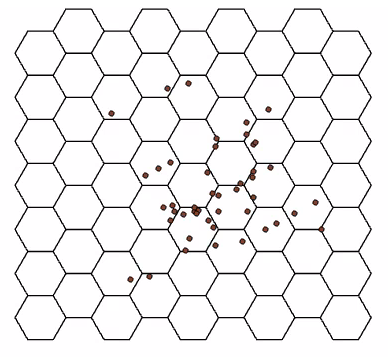
Figure 5. Snippet of output when using the “Generate Tessellation” geoprocessing tool. Note that the geo-coded security incidents were not exported to .SVG – only visible here for demonstration purposes.

Figure 6. Snippet of input when using the “Summarize Within” geoprocessing tool.

Figure 7. Snippet of output when using the “Summarize Within” geoprocessing tool. Note that this image was not exported to .SVG but merely serves as a guide for the physical model.

When the project idea was first conceived, it was paramount that I familiarized myself with the resources available and necessary for this project. To do so, I applied for membership to the Library’s Collaboratory research space for graduate students and faculty members (https://library.ryerson.ca/collab/ – many thanks to them for making this such a pleasurable experience). Once accepted, I was invited to an orientation, followed by two virtual consultations with the Research Technology Officer, Dr. Jimmy Tran. Once we fleshed out the idea through discussion, I was invited to the Collaboratory to partake in mediated appointments. Once in the space, the aforementioned .SVG files were opened in an image editing program where various aspects of the .SVG were segmented into either Red, Green, or Blue, in order for the laser cutter to distinguish different features. Furthermore, the tessellation layer was altered to now include a 5mm (diameter) circle in the centre of each hexagon to allow for the eventual insertion of magnets. The base map would be etched onto an 11×8.5 sheet of clear acrylic (3mm thick), whereas the hexagons would be cut-out into individual pieces at a size of 1.83in vertex-to-vertex. Atop of this, a black 11×8.5 sheet of black acrylic would be cut-out to serve as the background for the clear base map (allowing for increased contrast to accentuate finer details). Once in hand, the hexagons would be fixed with 5x3mm magnets (into the aforementioned circles) to allow for seamless stacking between pieces. Stacks of hexagons (1 to 5) would represent the five classes in the 2D map, but with height now replacing the graduated colour schema (see Figure 7 and Figure 9 – although the varying translucency of the clear hexagons is also quite evident and communicates the classes as well). The completed 3D model is captured in Figure 8, along with the legend in Figure 9 that was printed out and is to always be presented in tandem with the model. The legend was not etched into the base map so as to allow it to be used for other projects that do not use the same classification schema, and in-case I had changed my mind about a detail at some point.

Figure 8. 3D Laser-Cut Acrylic Hexbin Model depicting three-years worth of security incidents on campus. Multiple angles provided.

Figure 9. Legend which corresponds the physical model displayed in Figure 8. Physical version has been created as well and will be shown in presentation.

FUTURE RESEARCH DIRECTIONS AND LIMITATIONS

The geo-visualization project at-hand serves as a foundation for a multitude of future research avenues, such as: exploring other 3D modalities to represent human geography phenomenon; as a learning tool for those not privy to cartography; and as a tool to collect further data regarding perceived and experienced areas of crime. All of which expand on the aspects tangibility, interchangeability, and gamification harped on in the project at-hand. With the latter point, imagine a situation where a booth is set up on campus and one were to simply ask “using these hexagon pieces, tell us where you feel the most security incidents on campus would occur.” The answers provided would be invaluable, as they would yield great insight into what areas of campus community members feel are most unsafe, and what factors may be contributing to it (e.g. built environment features such as poor lighting, lack of cameras, narrowness, etc.), resulting in a synthesis between the qualitative and quantitative. Or on the point of interchangeability, if someone wanted to explore the distribution of trees on campus for instance, they could very well laser-cut their own hexbins out of green acrylic at their own desired size (e.g. 100m), and simply use the same base map.

Despite the fairly robust nature of the project, some limitations became apparent, more specifically: issues with the way a few security incident’s data were collected and displayed on the university’s website (e.g. non-existent street names, non-existent intersections, missing street suffixes, etc.); an issue where the exportation of a layer to .SVG resulted in the creation of repeated overlapping of the same images that had to be deleted before laser cutting; and lastly, future iterations may consider exaggerating finer features (e.g. street names) to make the physical model even more legible.

Visualizing Freshwater Resources: A Laser Cut Model of Lake Erie with Water Volume Representations

Author: Anna Brooker

Geovisualization  Project Assignment @RyersonGeo SA8905, Fall 2018

Freshwater is a limited resource that is essential to the sustenance of all life forms. Only 3% of the water on earth is freshwater, and only 0.03% is accessible on the surface in the form of lakes, streams, and rivers. The Great Lakes, located in Southern Ontario and along the US border, contain one fifth of the surface freshwater. I wanted to visualize this scarcity of freshwater by modelling Lake Erie, the smallest of the Great Lakes. Lake Erie is 6th largest freshwater lake in the world, but is has the smallest water volume out of the Great Lakes. I decided to create a laser cut model of the lake and use water spheres to represent its proportion of the world’s surface freshwater resources. I used the infographic from Canadian Geographic for reference.

Process:

  • Retrieve bathymetric imagery and import into ArcScene
  • Generate contours lines for every 20m of depth and export them each into individual CAD files
  • Prepare the CAD files in an Adobe Illustrator layout file to optimize them for laser printing
  • Paint and assemble the laser cut layers
  • Create spheres out of clay to scale with the model

The following images show the import of the bathymetric imaging and contour retrieval:

The bathymetry data used was collected in 1999 by the National Oceanic and Atmospheric Association and comes in a raster file format. They were retrieved from Scholar’s Geoportal. I used a shapefile of the Lake Erie shoreline from Michigan’s GIS Open Data as a mask to clip the raster imaging to only the extent of the lake surface. I then created 20m contours from the raster surface. I exported each of the 3 contour vectors into individual shapefiles. These were added to the scene and exported again as CAD files to be able to manipulate them in Adobe Illustrator and prepare them on a template for laser cutting.

The screenshots above show the template used for laser cutting. The template was downloaded from the Hot Pop Factory homepage. Hot Pop Factory is the service I used for laser cutting the plywood layers. I used their templates and arranged my vector files to reflect the size I want the model to be, 18″x7″. I added the rectangles around each contour to ensure a final product of a rectangular stacked model. I then sent this to the Factory for cutting. The photos below show what I received from Hot Pop.

Lake Erie is incredibly shallow with maximum depth of 64m. In order to show the contours of the lake I needed to exaggerate the depth. Limited by the thickness of the materials available to me, the final model had an exaggerated depth of approximately 130% at its deepest point. The final result of this exaggeration allowed me to create three layers of depth to Lake Erie and make it more visually engaging. I included as a part of my model a flat cut out of Lake Erie, which is what the model would have looked like if I had not exaggerated it.

The water volume spheres were created using a material called porcelain clay. This air dry medium has a slightly translucent finish. I stained the clay with blue oil paint so that it would intuitively represent water. The size of the spheres is based on the information in the Canadian Geographic infographic linked in the introduction to this tutorial. The diameter of the spheres was made to scale with the scale bar on the models. A limitation with this model is that the scale bar only refers to the lateral size of the lake and spheres, and does not refer at all to the depth of the model.

The photos above show the final product. The photo on the right shows the scale bar that is included on both parts of the model. I painted the interior layers in blue, the top two layers in the same shade. The third layer was slightly darker, and the deepest layer was the darkest shade of blue. I chose to paint the layers in this way to draw attention to the deepest part of the lake, which is very small area. I attached the layers together using wood glue and laid them beside each other for display.  I painted the 3D and 2D models in slightly different hues of blue. The 2D model was made to better match the hue of the water spheres to visually coordinate them. I wanted the spheres to be distinct from the 3D model so that they would not be interpreted as being representative of the water volume of an exaggerated model.


Creating a Toronto City Ward Model Using Laser Cut Acrylic

by Selasi Dorkenoo

SA8905 Cartography and Geovisualization Fall 2018

To better understand characteristics of the new municipal electoral wards in the City of Toronto, the new 25-ward boundary shapefile provided by the City of Toronto was converted to vector format and laser cut into five translucent sheets of acrylic. Each piece is engraved with the ward ID. Laser cutting allows the puzzle to not only fit together with precision, but also visualized the demographic census data using redundant symbology: opacity (lightness) and height.

Ward boundaries were retrieved from Toronto Open Data Catalogue and imported into ArcGIS Desktop. The model was designed to be cut into 16 in x 8.5 in sheets of 3mm acrylic, including legend items and a scale bar. Features in black (below) represent pieces that were laser cut and features in red represent laser engraving on a piece. Using layout view, the design was exported as a vector (.ai) file and sent to Hot Pop Factory for their laser cutting services.

Once the acrylic was cut, a magnet was super-glued to each piece below the engraved ward IDs. The magnets used were about 6mm in diameter and 2mm in thickness. Magnets were also attached to the scale bar and legend items. Using a magnetic white board as a base for the model, the pieces were stacked and the model itself was complete.


Demographic data at the ward level was retrieved from Toronto Open Data Catalogue as well. Once joined to the ward boundary file, a set of choropleth maps including population density, visible minorities, unemployment rate and average personal income were created. A maximum of five bins can be used to classify the data in each map since only five sheets of acrylic were laser cut for the model.

A catalogue of these maps was printed and packaged with the ward model. Users can browse through the catalogue and select which variable they wish to map. Using dry erase markers they can write the necessary cartographic elements on the mapped area (i.e. legend labels and title).

Use of a Laser Cutter to Create a 3D Bathymetric Chart

Mallory Carpenter,  SA8905 Geovisualization Assignment, Fall 2015

Bathymetric, or depth data collected about oceans and other water bodies are typically displayed in one of two ways –  as a bathymetric chart, or as a depth raster.  New technologies such as 3D printers and laser cutters allow for the better communication of depth data. Laser cutters in particular allow for “etching,” which can simultaneously communicate topographic data.  This allows the viewer to better situate themselves in the landscape.  Examples of this can be seen here and here.

A fjord is a coastal feature formed by glaciers.  Typically, they contain steep vertical sidewalls, and deep basins separated by shallow sills (ridges of bedrock which rise to depths of less than 50 m).  Mapping Nachvak Fjord in 3D, located in the Torngat Mountains in Labrador, will help to better illustrate the unique bathymetric features.

The basic process is this:

  • Collection and processing of bathymetric data into useable raster format.
  • Importation of the raster data into GIS software.
  • The creation and export of contour data as vector files to secondary graphics.
  • The division of contours into separate layers, and the addition of any graphics for “etching.”
  • Different colours in the vector file are used to differentiate between etching and cutting.

The screenshots below show the bathymetric data collected between 2003 and 2009 by the Canadian Hydrographic Service and ArcticNet. The data are available for free for download from the Ocean Mapping Group website. The spatial resolution of the data is 5×5 m with a vertical accuracy of 1 m. The data ranges in depth from 211 m to 1 m.  Contours were created at 20 m intervals, smoothed and exported as vector files.
The data used for etching the topographic map on the top layer are a product called CanVec, which is downloadable for free from Geogratis. The contour interval was reduced to 200 m to improve visibility. Extraneous shapefiles such as points were removed.

Nachvak1

The data were manipulated in iDraw (a Mac-based vector graphics program) to smooth out overlapping lines and crop to an appropriate area as shown in the following screenshot.

Nachvak2

The laser printer has a 2 x 4 foot printing bed.  In order to save materials and cutting time, layers need to be nested in the bed space, colour coded for cutting and etching, and exported as either a PDF or SVG.  Each contour makes up a layer – with a solid rectangle for the base, and the topographic information etched into the top layer.  The following screenshot shows two cutting surfaces, each with 5 map layers.

Nachvak5

nachvak4

The laser cutting was done at the Danforth Tool Library (http://torontotoollibrary.com), out of 1/4 inch Birch Plywood.  They were cleaned (the cutting produces soot), stained, and glued together with carpenter glue.

Nachvak5

Initial plans included the use of etching to detail habitat and substrate information.  Time and finanical constraints limited the amount of etching work that could be done.  Additionally, if the project were repeated it could be worth either using thinner materials, or increasing the contour interval.  The slope on the side walls is so steep, and the fiord so narrow that the fine details are hard to see in the final version.

Nachvak7