Andrea Santoso-Pardi
SA8905 Geovis project, Fall 2024
Introduction
Using aerial photogrammetry into Minecraft builds is an interesting way to combine real-world data with a video game that many people play. Adding aerial photogrammetry of a building and city is a way to get people interested in GIS technology and can be used for accessibility reasons to understand where different buildings are in the world. This workflow will introduce the process finding aerial building photogrammetry, using the .obj file to process it with Blender plugins (BlockBlender 1.41 and BlockBlender to Minecraft .Schem 1.42), exporting it as a .schem file for use in single player Minecraft Java Edition 1.21.1 by using the Litematica to paste the schematic, converting the model from latitude and longitude coordinates to Minecraft coordinates and editing the schematic
List of things you will need for this
- Photogrammetry – preferably one that is watertight with no holes. If holes are present, one will have to manually close the holes.
- You can either collect your own photogrammetry, create one using a video or get a it from a website
- If you want to clean up your photogrammetry I suggest using MeshLab as it is free to use and personally, it is easier than using Blender for cleaning the model up. Just make sure you remember there is no typical undo button and you will need a desktop to run Meshlab. A laptop will not work.
- Canadian Government Building Photogrammetry by Air Digital Historical Scanning Archive on SketchFab1 is the model I will be using for this assignment. I downloaded the model as an .OBJ file.
- You can either collect your own photogrammetry, create one using a video or get a it from a website
- Blender 3.6.2 – a free 3D modelling software. This does not work with the latest realease of 4.3 as of when I am writing this
- Addons to use:
- BlockBlender 1.41 ($20 Version) – Paid by the TMU Library Collaboratory, used to convert the photogrammetry into minecraft block textures
- BlockBlender to Minecraft .Schem 1.42 – used to export the file into .schem file, a file which minecraft can read
- Addons to use:
- Minecraft Java Edition ($29.99) – a video game played on a computer. This is different to Minecraft Bedrock Edition
- Fabric Loader
- Mods needed
- Litematica (litematica-fabric-1.21.1-0.19.50)
- MaLiLib (malilib-fabric-1.21.1-0.21.0)
- Fabric Loader
Gathering Data: What is Aerial Photogrammetry & What is the best model to use?
Aerial photogrammetry is a technique that uses overlapping photographs captured from above and various angles to create accurate, measurable 3D model or maps of real-world landscapes, structures, or objects. However, photogrammetry is becoming a lot more accessible, it is now able to be created by just using a phone camera. The dataprocessing for drone imagery of a building includes:
Point Clouds which are a dense collection of points representing the object or terrain in 3D space. And also 3D Meshes which are surfaces created by connecting points into a polygonal network. The polygonal network of Aerial photogrammetry of a building is usually many triangles.
If you are going to search up a photogrammetry model to use, here is what made me choose this one of a government building and also know that it was photogrammetry.

- Large number of triangles and vertices. The model had 1.5 Million Triangles and 807.4k Vertices. 3D models made using 3D modeling Software will have lower counts of both of in the tens of thousands. This is how I knew it was photogrammetry.
- Minimal clean up. There was little to no clean-up required on the model for it to be able to be put into minecraft. Of course if you do not care that a lot of clean-up needs to happen before being able to convert the photogrammetry into blocks then you can do so. But know it will take hours depending on how many holes the model has.
- I spent too many hours trying to clean-up Kerr Hall photogrammetry and it still had all the holes associated with it. If you want to do Kerr Hall please contact the Facilities for Campus Data for floor plans and walls for what it is supposed to look like outside to ensure the trees aren’t in the photogrammetry. Then use Blender Architecture and BlenderGIS plugins to scale the building accordingly
- States the Location/Coordinates. If you want the elevation of the model, you will need to know where it is geolocated in the world. Having the coordinates makes this processes easier in BlenderGIS
- Minimal/Zero Objects around the wall of the building. When getting photogrammetry, objects too close to the wall can merge with the building wall. Things like trees make it very hard to get clear viewing of the wall to the point that there might not even be a wall in the photogrammetry.
- The topology of trees makes it so many tiny holes may happen instead. Making sure no objects are around the buildings ensures that I know that the walls are and will be visible in the final product. Do a quick 360 of the photogrammetry to ensure this is the case for the one you want
- Ensure to be able to download as a .OBJ file. For Blockblender to work the building textures need to have photos for blockblender to assign a block to the photo pixel
- Consistent Lighting all around. If different areas of the building have different lighting it does not make for a consistent model as I don’t want to change the brightness of the photo.
When exporting the model I chose an OBJ format as I knew that it was compatiable with the Blockblender addon to work.

When exporting, ensure you know where it downloads to. Extra steps like unzipping the file may occur depending on how it is formatted.
Blender
Blender is a free 3D modeling software that was chosen due to its high customizable editing options. If you haven’t used blender before, I suggest learning the basic controls this is a playlist to help understand each function.
Installing Addons
Download all the files you need as .zip files
Go to Edit > Preferences > Install From Disk and import the .zip files of the add-ons. Make sure you save your preferences. Just as a reminder, the ones needed for this tutorial are: BlockBlender 1.41 ($20 Version) and Minecraft .Schem 1.42
Import & Cleaning Up the .obj Model
To import the model go to File > Import > Wavefront OBJ .
The file does not have to be an .obj to work. But it does have to textures that are separate from the 3D Model if you want to use the Blockblender add-on.
Import the same model twice. One to make into Minecraft blocks and the other to use as a reference. Put them into different collections. You can name them “Reference” and “Editing” . Press M to Create two separate collections for each model.
To clean up the model to have it ready for use in blockblender, the model has to have a solid , watertight, mesh. In short, what this means is that the mesh of the model needs to have closed edges. It’s a bit hard to explain. Its not necessary to learn if your 3D model requires minimal clean up. But if you want to understand more of what I mean this resource might be helpful. https://davidstutz.de/a-formal-definition-of-watertight-meshes/
Go into Edit Mode. Click on the model (it should have an orange outline) and go into edit mode (see top left corner). Alternatively you can hit Tab to switch between Edit and Object Mode
Press A to Select All
Go Above into Select > Select Loops > Select Boundary Loop

It should look like this afterwards, with only the boundary loops selcted
Press Alt + F to fill in the faces
If you look underneath the model, you can see how it makes the mesh watertight


You can now exit edit mode. You can see in Object mode how the hole in the model is now enclosed. This has created a watertight solid mesh.


You can also clean up models with holes the same way. For complex models however, select the area around where the hole in the model is instead of select all.
If you would like an only visual explanation here is a video. Don’t switch over to sculpt mode and don’t enable Dyntopo and go into the sculpting mode as you will lose textures. The textures are needed for blockblender. If you do accidentally do dynotopo, Ctrl + Z can be used to undo or you can copy and paste your reference and do this section over again.
BlockBlender
Blockblender is an add-on for blender created by Joey Carolino, if you want to know how to visually see how blockblender is used better, below is a youtube video of how to use more functions in BlockBlender. There is a free version and a paid version of blockblender so if you cannot contact the Library Collaboratory to use the computer with the paid Blockblender then you can use the free version
Using Blockblender
Before doing this step, save your work to ensure that nothing goes away
Select the model and press Turn Selected Into Blocks. This will take a while to fully load. When it does, the model will look like glass. If blender becomes too laggy, exit blender and dont save. You can reduce the size of your model before doing this section to ensure you can add all the textures needed

To find out the image ID and what order to use them, go to the Material Properties It should look like a Red circle.

The names of the photo are shown and to ensure the model looks like the picture you must put it in that order or else it will not look like the reference model.


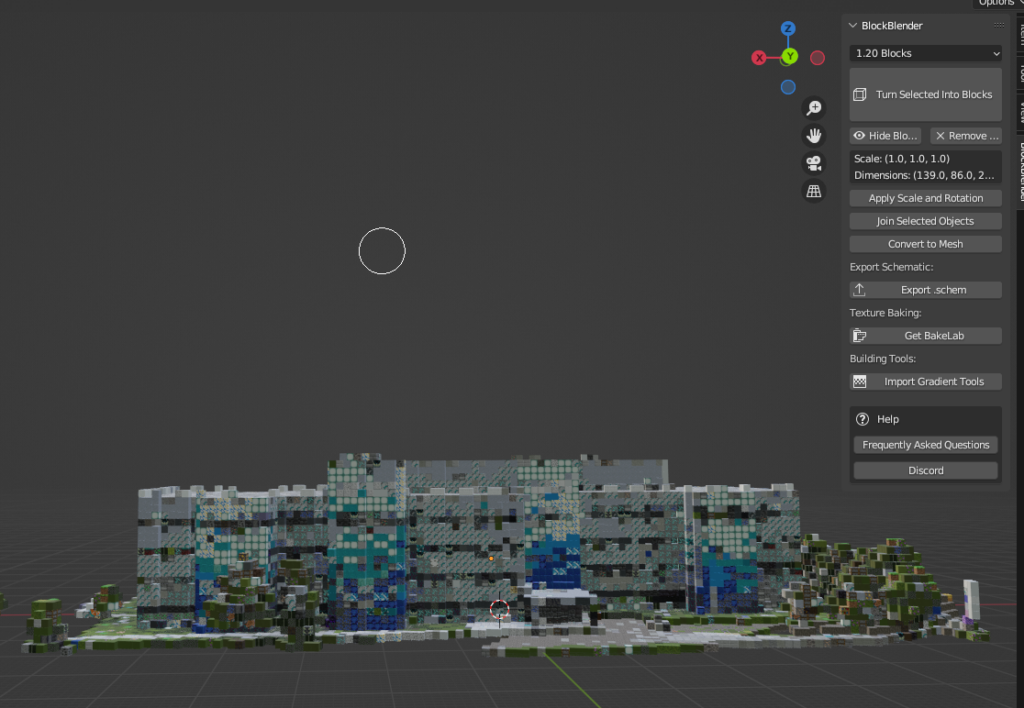
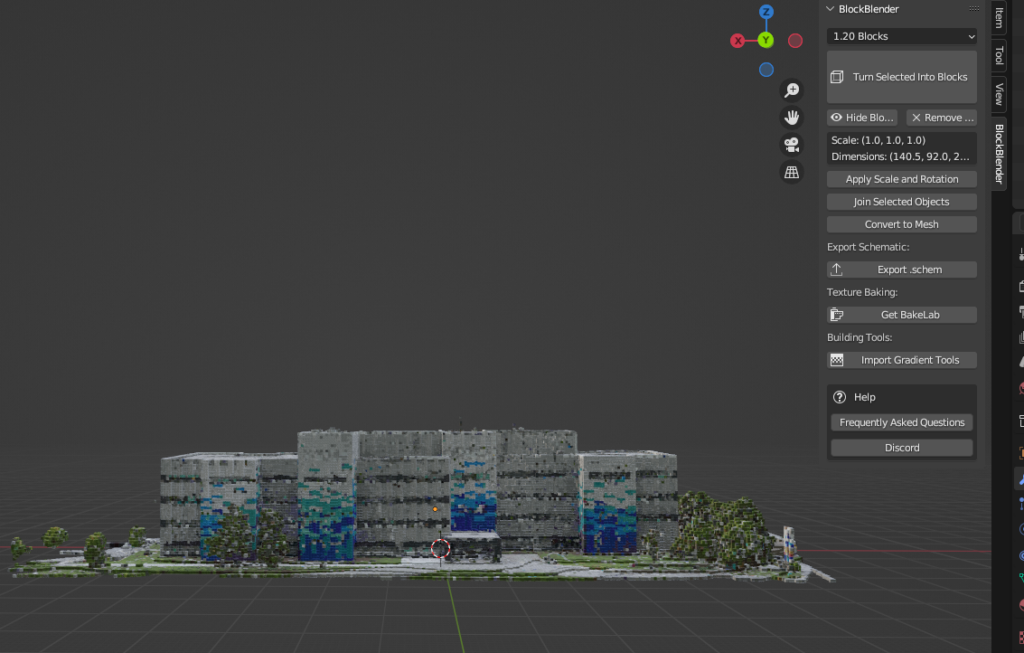
Here is what the Blockblender Model looks like

From here, Blockblender has different tools to choose the block selection. Each block is categorized into these areas in the Collections Area. However You can select individual blocks and move them into the unused collection by dragging and dropping. Alternatively press CTRL to select multiple to drag and drop

I also felt that the scale of 1 Block = 1m did not give enough detail so the block size was changed to 0.5m

The final model I ended up going with is below. Although it is not perfect, I can manual edit, use Litematica or Minecraft commands afterwards. It is hard to show how the workflow with just pictures so highly suggest the video above to see more of the functionality.

Blockblender to .Schem
This add-on was created by EpicSpartanRyan#8948 on Discord. Special thanks to him. They are also available for hire if someone wanted to put buildings into minecraft to make a campus server with a 30 minute free consultation and aims to respond in 12 hours.
Putting this into a .schem file allows it to be read in a format that minecraft understands.
To quickly see how it would work to export and put into Minecraft but using World Edit and in multiplayer server, please see his video below. It also compares what the textures in blender look like to what it looks like inside of minecraft
Using Blockblender to .Schem
To prepare the file to export,
Uncheckmark “Make Instances Real”
Click the model. Press Convert to Mesh in the N-panel to make the mesh look more like minecraft blocks rather than triangles. You can see if the mesh has changed by selecting the object and going into Edit Mode or by looking at the viewport wireframe
Click the model. Press Ctrl + A and apply All Transforms This will ensure all the textures will be there

Next, you want to go into File > Export > Minecraft (.schem) or press Export as schem on the N-panel Blockblender options. The N-panel can be seen in the previous section

Save the file whatever name you want but to ensure the .schem file is saved to your schematics folder. This is to save time trying to find where you put the model later. This can be found by searching %appdata% on your file pathway area. The file path should be
C:\Users\[YourComputerProfileName]\AppData\Roaming\.minecraft\schematics
If a schematics folder is not present, make one inside the .minecraft folder

Minecraft
Installing Minecraft, Fabric Loader and Mods
If you need help downloading Minecraft look at this article. https://www.minecraft.net/en-us/updates/instructions . I bought Minecraft in 2013 so I’m unsure of the process of what buying and downloading Minecraft is like now as I refuse to buy something that I already have. This video here may also be helpful but I have not followed along but I did watch it to ensure the video makes sense.
Fabric Loader
Fabric Loader is used as a way to change the minecraft experience from vanilla (default minecraft) to whatever experience you want by downloading other mods. It acts as bridge between the game and the mods you want to use.
To download, Choose the download that works best for the device you are on. For me that was Download for Windows x64, the latest version of Fabric Loader which is named fabric-installer-1.0.1 but it may change in the future.
Press to run the installer until it opens up to here. Since I am not running fabric on a server but on a client (single player usually), I downloaded it to Minecraft 1.21.1 and the Latest Loader Version.

Mods: Litematica and MaLiLib
Before entering Minecraft download the mods and add them to your mods folder. You do not need to do anything to the mod after it is downloaded except to move them into the Minecraft mod folder.
The general pathway would be C:\Users[YourComputerProfileName]\AppData\Roaming.minecraft\mods
It should all keep as the WinRAR archive
- Litematica (litematica-fabric-1.21.1-0.19.50)
- MaLiLib (malilib-fabric-1.21.1-0.21.0)

Launching Minecraft Java

Ensure to change the loader to be fabric-loader-1.21.1 so the mods will be attached. Once it is changed, press the big green button that says Play
Create a New World
This is just to import the model into Minecraft Java 1.21.1 SinglePlayer so I went into Singleplayer > Create New World and Here are the options chosen
Game Tab
Game mode : Creative
Difficulty: Peaceful
Allow Commands On
World Tab
World Type : Superflat
Generate Structures : Off
Bonus Chest : Off
Once having the options you like, you can create a New World.
Using Litematica
The building can be placed down in any world using the Litematica Mod. If you have any troubles using it, for the basic commands How To Use Litematica by @ryanthescion helped a lot in learning how to use the different commands
The minecraft stick is used in Litematica to toggle between modes. To get a minecraft stick, press E to open up the inventory / creative menu and search up Stick (which it opens to the search automatically) or find it under the Ingredients Tab

Left Click and Drag the stick into your hotbar (the area where one can see the multiple wooden sticks) and exit out of the inventory pressing E
Note that one stick is enough for the mod to work as it has to be held in your hand to use. The multiple sticks there are to show where the hotbar is.
With the Stick in your hand, one can toggle between the different modes by pressing CTRL + Scroll Wheel to go between 9 different modes.
Adding The Model
What I did in short was open the Litematica menu by pressing M , went to the Configuration menu
Hotkeys is a place to create custom keyboard and/or mouse shortcuts for different commands. Create a shortcut that is has no existing shortcut for it already. The tutorial used J + K for “executefunction” to paste the building so I followed the tutorial and use those also so now I will have to press J and K to execute a command. If there is a problem with the hotkeys used, it would turn a yellow/orange colour instead of white.

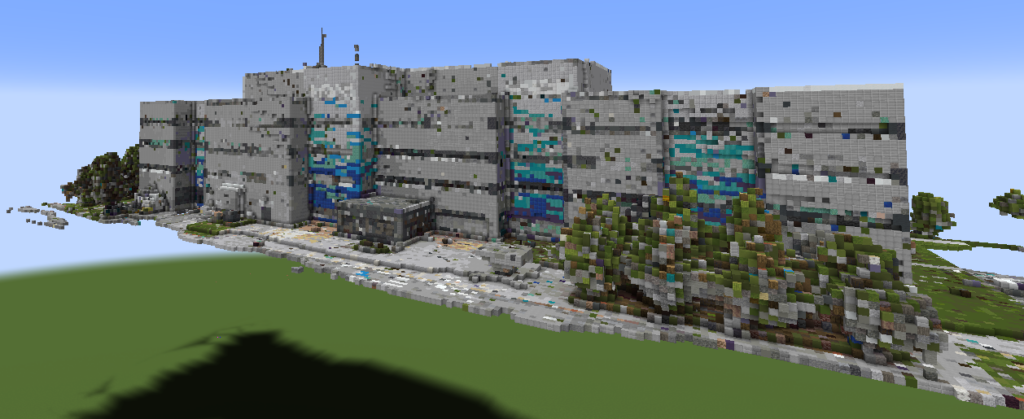
Next I went back to the Litematica menu went to Load Schematics added the folder pathway were I keep the schematics. Pressed the schematic build file I wanted to Load then pressed Load Schematic at the bottom of the page. Thus the government building was pasted into minecraft.

Converting Latitude and Longitude to Minecraft Coordinates
In the Litematica menu press the Loaded Schematics button then go to Schematic Placements > Configure > Schematic placement and you can change the building to be the same coordinates as in real life. Y is 18 because using the “What is My Elevation” website at the coordinates states 9m. Since 1 block is equal to 0.5m in our model, 9m divded by 0.5 is 18m.
The X and Z coordinates are if the geographic coordinate system of Earth converted with what the minecraft coordinate system is (Cartesian Coordinates). The conversion between the geographic coordinate system uses the WGS84 coordinate system (World Geodetic System 1984) and Cartesian Coordinates assumes both origins start at 0,0,0 and 1 block = 0.5 metres. If 1 degree of latitude and 1 degree of longitude both are 111,320 metres (for this projection)2:
Latitude in blocks per degree = 222,640 blocks per degree
Metres per degree of longitude = [111,320 × cos(latitude in radians) ] / 0.5
To align this with real-world geographic coordinates (latitude and longitude), one needs to define a reference point. Since the the real-world origin (0° latitude and 0°, longitude) is set to correspond to X = 0 and Z = 0 in minecraft. The formulas below is used to calculate the difference in Latitude and Longitude based off of this
The Formulas to Convert to Minecraft are:
Minecraft Z Coordinates = [ΔLatitude × 111,320] / [Scale (meters per block)]
Minecraft X Coordinates = [ΔLatitude × ( 111,320 × cos(Origin Latitude in radians))] / [Scale (meters per block)]
Minecraft Y Coordinates = Elevation in metres / Scale (metres per block)
Where:
ΔLatitude = Target Latitude − Origin Latitude
ΔLongitude = Target Longitude − Origin Longitude
Target Latitude is 47.621474856679534°
Target Longitude is −65.65655551636287°
If Origin is 0° latitude and 0°, longitude
Scale (metres per block) = 0.5 metres
Using cosine has it so the conversion better reflects real-world distances as Earth is a spheroid an minecraft is flat
Therefore the Minecraft coordinates are
Minecraft X Coordinates = −9,858,611
Minecraft Y Coordinates = 18
Minecraft Z Coordinates = 10,606,309

Note: You will have to Teleport to where the model is put do /tp <playername> x y z to where the building is loaded
Fixing The Model

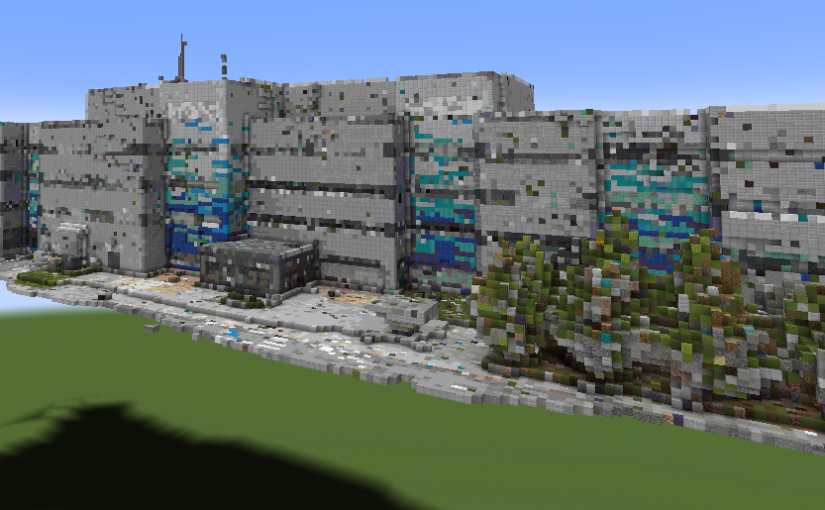
There were many edits that needed to happen. I fixed the trees to actually have trunks as the textures did not load them in properly. I used what generated as a guide for what the shapes for the trees should look like

I also tried to change the pattern on the wall to more accurately reflect what it looks like in the photogrammetry

Helpful Tips
/time set day
/effect give <targets> <effect> infinite [<amplifier>] [<hideParticles>]
To edit the schematic Minecraft Litematica schematic editing by @waynestir on Youtube was the most helpful this allowed me to replace blocks and have them as the schematic.
Limitations
Using this approach of taking aerial building photogrammetry, using blender to make it minecraft blocks and then trying to convert the latitude and longitude coordinates to minecraft to put the building in the exact right spot is that Minecraft is a fixed grid cubic Block representation which will lack the detail of the 3D aerial building photogrammetry model on any given day. To try to make a scale that allows for the geolocation correctness and building height but transferred over to minecraft is a fine detail task that has to try to balance the artistry with reality.
In Blockblender, fine details like the antennae at the top of the building don’t come through as it only uses blocks for the representation. so railings, window frames and more could be lost or require block subsitutes.
The Photogrammetry can be very complex and very noisy with shadows that may make blockblender interpret the data wrong. Blockblender as an add-on is limited to the minecraft default colours which may not accurately reflect what real-world surfaces look like or are made out of.
The Minecraft height limit can be an issue depending on how tall the building is you want to convert.
Geolocating the building from latitude and longitude to minecraft coordinates will not work on a much larger scale (i.e keeping the scale at 0.5m is 1 block) as the minecraft world is 30 million by 30 million.
Litematica also has limited functionality until one has to do a lot more manually or use another plug in.
Conclusion
This workflow is an excellent way to bring real-world data into Minecraft, but it requires balancing the complexity of photogrammetry models with Minecraft’s block-based limitations. Understanding and addressing these challenges produce detailed, manageable builds that work well in Minecraft’s unique environment.
Footnotes
- “Canadian Government Building Photogrammetry” (https://skfb.ly/oLZyt) by Air Digital Historical Scanning Archive is licensed under Creative Commons Attribution (http://creativecommons.org/licenses/by/4.0/) ↩︎
- https://www.esri.com/arcgis-blog/products/arcgis-desktop/defense/determining-a-z-factor-for-scaling-linear-elevation-units-to-match-geographic-coordinate-values/ ↩︎
