Geovis Project Assignment, TMU Geography, SA8905, Fall 2024 by Khadija Safi
Hello everyone! I’m excited to share my tutorial on how to use the animation capabilities in ArcGIS Pro to visualize 3D data and create an animated video.
My inspiration for this project was learning more about my ancestral homeland, Afghanistan, whose history and culture are known to have been heavily influenced by its location and topography.
Since I also wanted to gain experience working with the 3D layers and animation tools available in ArcGIS Pro, I decided to create a 3D animation of how geography has influenced Afghanistan’s history and culture.
My end product was an educational video that I narrated and posted on Youtube.
The GIS software I used in this project was ArcGIS Pro 3.3.1. I also used the Voice Memos app to record my narration, and iMovie to compile the audio recordings and the exported ArcGIS Pro movie into one video.
For my data sources, I derived the historical information presented in the animation from a textbook by Jalali (2021), the political administrative boundary of Afghanistan from geoBoundaries (Runfola et al., 2020), and the World Elevation 3D/Terrain 3D and World Imagery basemap layers from ArcGIS Pro (Esri et al., 2024; Maxar et al., 2024).
For this tutorial, I will only be providing a broad overview of the steps I took to create my end product. For additional details on how to use the animation capabilities in ArcGIS Pro, please refer to Esri’s free online Help documentation.
Now, without further ado, let’s get started!
Key Learning Objective
To design and create a geographic-based animation involving 3D data using ArcGIS Pro.
Note
The following convention was used to represent the process of navigating the ArcGIS Pro ribbon: Tab (Group) > Command
Step 1: Come Up With the Storyline
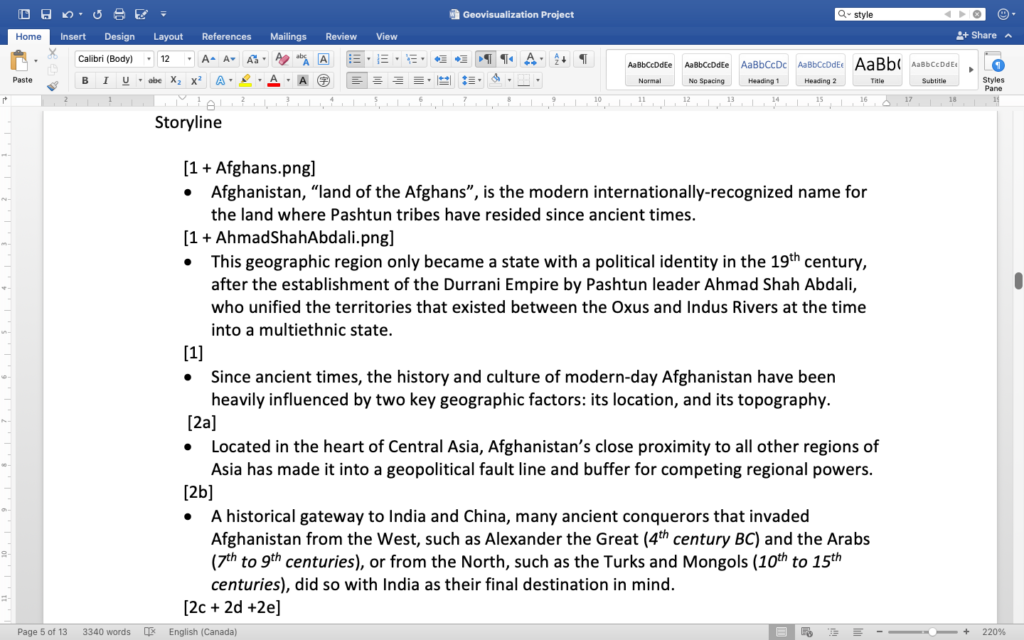
Since I wanted to create a narrated video as my end product, I first had to research my topic and decide what kind of story I wanted to tell by writing the script that would go along with each keyframe.
Step 2: Record the Narration Using Voice Memos
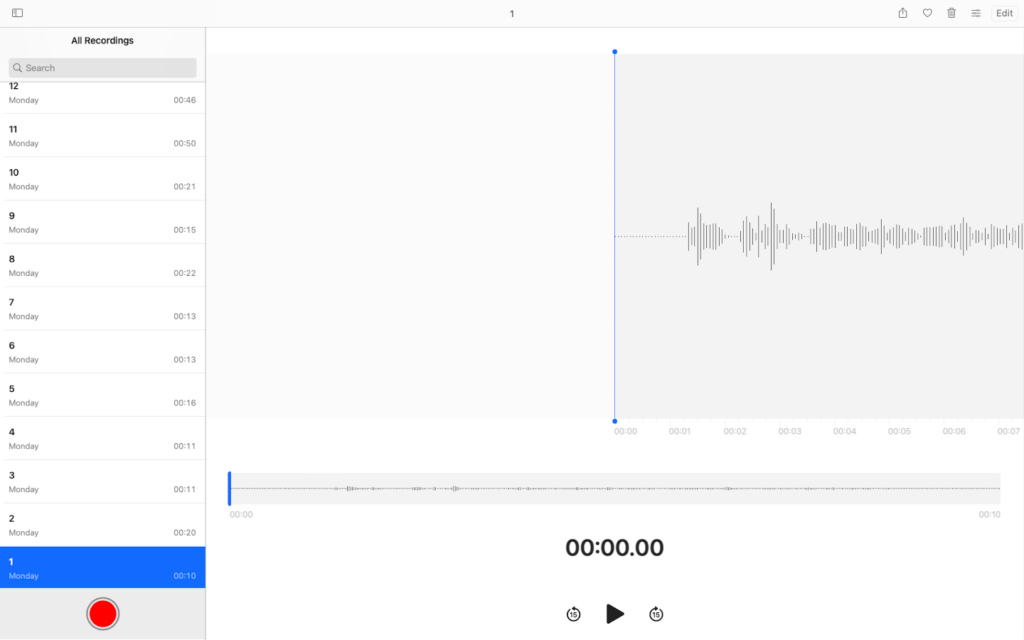
The next step was to record the narration using the script I wrote so that I could have a reference point for my keyframe transitions.
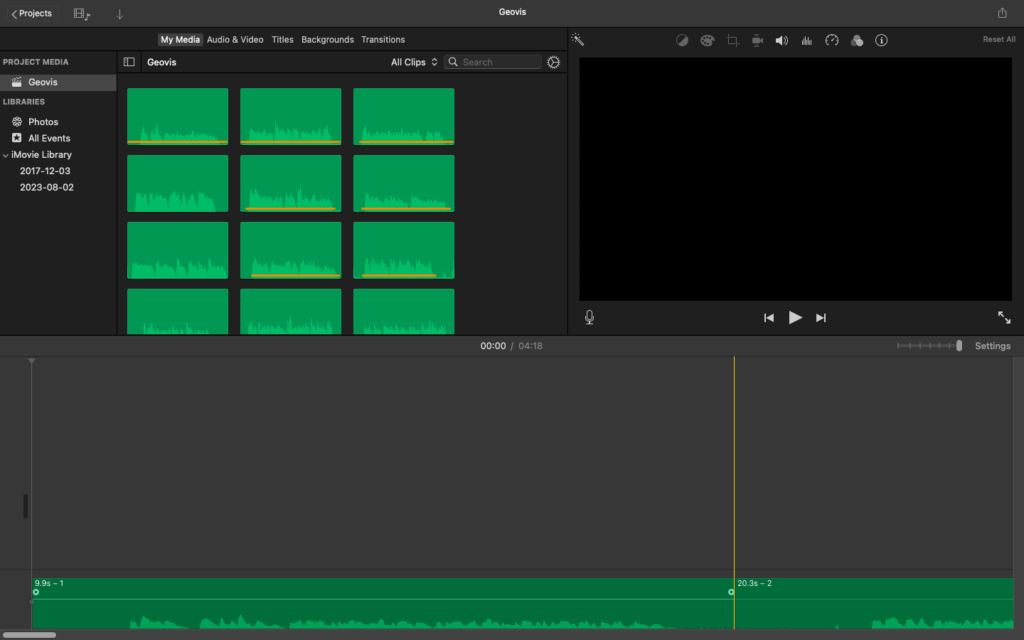
This process was as simple as hitting record on Voice Memos, then uploading each audio file to a new iMovie project.
The audio files were trimmed and aligned until a seamless transition between each clip was achieved.
Step 3: Create the Animation in ArcGIS Pro
To create the animation, the following steps were taken:
(3.1) Open a new “Local Scene” project in ArcGIS Pro
(3.2) Load and prepare the data
In my case, the Terrain 3D layer was automatically loaded as the elevation surface. To load the World Imagery layer, I had to navigate to Map (Layer) > Basemap and select “Imagery”.
I then added and symbolized the political administrative boundary shapefile I downloaded for Afghanistan.
To mark the locations of the three cities I included in some of the keyframes, I also created my own point geometry using the graphical notation layer available through Insert (Layer Templates) > Point Map Notes. The Create tool under Edit (Features) was used to digitize the points.
Finally, I downloaded two PNG images to insert into the animation at a later time (Anonymous, 2014; Khan, 2010).
(3.3) Create bookmarks for the animation keyframes
Although an animation can be created regardless, bookmarking the view you intend to use for each keyframe is a good way of planning out your animation. The Scene’s view can be adjusted and updated at a later time, but this allows you to have an initial framework to start with.
ArcGIS Pro also allows you to import your bookmarks to automatically create keyframes using preconfigured playback styles.
Creating a Bookmark
To open the Bookmarks pane, click on “Manage Bookmarks” under Map (Navigate) > Bookmarks. Zoom to your desired keyframe location and create a bookmark using the New Bookmark subcommand.
Tip
The Locate command under Map (Inquiry) can be used to quickly search for and zoom to any geocoded location on the Earth’s surface.
Adjusting the View
To change the camera angle of your current view, use the on-screen navigator in the lower left corner of the Scene window. Click on the chevron to access full control.
By clicking and holding down on the bottom of the arrow on the outer ring of the on-screen navigator, you can rotate the view around the current target by 360o.
Clicking and holding down on the outer ring only will allow you to pan the Scene towards the selected heading.
To change the pitch of the camera angle or rotate the view around the current target, click and hold down on the inner ring around the globe, then drag your mouse in the desired direction.
Finally, clicking and holding down on the globe allows you to change your current target.
(3.4) Activate the Animation tab
If your current Scene has never been initialized for an animation, the Animation tab can be activated through View (Animation) > Add.
(3.5) Set up the resolution of the exported animation
To ensure you design the animation to fit the resolution you intend to export to, click on Animation (Export) > Movie.
In the Export Movie pane, under “Advanced Movie Export Settings”, select your desired “Resolution”. You could also use one of the “Movie Export Presets” if desired. I chose “1080p HD Letterbox (1920 x 1080)” to produce a good quality video.
Note
This step is very important, as the view of your keyframes and the placement of any overlays you add are directly affected by the aspect ratio of your export, which is directly tied to your selected resolution.
(3.6) Create the animation
Start off by opening the Animation Timeline pane through Animation (Playback) > Timeline.
In the Bookmarks pane, click on your first bookmark. With your view set, click “Create first keyframe” in the Animation Timeline pane to add a keyframe.
Repeat this process until all of your keyframes are added.
Alternatively, as mentioned before, the Import command in Animation (Create) can be used to automatically load all of the bookmarks in your project as keyframes using a preconfigured playback style.
Tip
If you need to adjust the view of a keyframe, adjust your current view in the Scene window, then select the keyframe in the Animation Timeline pane and hit Update in Animation (Edit).
(3.7) Fine-tune the transition and timing between each keyframe
To configure the transition, time, and layer visibility of each keyframe, open the Animation Properties pane through Animation (Edit) > Properties and click on the Keyframe tab in this pane.
Choose one of the five transition types to animate the camera path: “Fixed”, “Adjustable”, “Linear”, “Hop”, or “Stepped”.
To create a tour animation that pans between geographic locations, a combination of “Hold” and “Hop” can be used. “Fixed” can be used to create a fly-through that navigates along a topographic feature.
Hit the play button in the Animation Timeline pane to view your animation and adjust accordingly.
Note
Although the Terrain 3D and World Imagery layers may not draw well in ArcGIS Pro due to their sheer size, they should appear fine in the exported video.
(3.8) Add text, images, and other graphics to annotate and communicate key information
Text, images, and other graphics can be added using the commands available in Animation (Overlay). Acceptable image file formats are JPG, TIFF, PNG, and BMP.
The position and timing of an overlay can be adjusted in the Overlays tab in the Animation Properties pane.
(3.9) Export the animation
Once you’re satisfied with your animation, you can export by clicking on Animation (Export) > Movie again.
Name the file and select your desired “Media Format” and “Frames Per Second” settings.
Your resolution should already be set, but you can adjust the “Quality” to determine the size of your file.
Hit “Export” once you’re ready. Depending on the size of your animation, it can take several hours for the video to export. Mine took over 10 hours.
Tip
You can also export a subsection of your animation by specifying a “Start Time” and “End Time”. This can be useful to preview the end result of your animation bit by bit without having to export the entire video, which can take a lot of time.
Step 4: Combine the Video and Audio Files Using iMovie
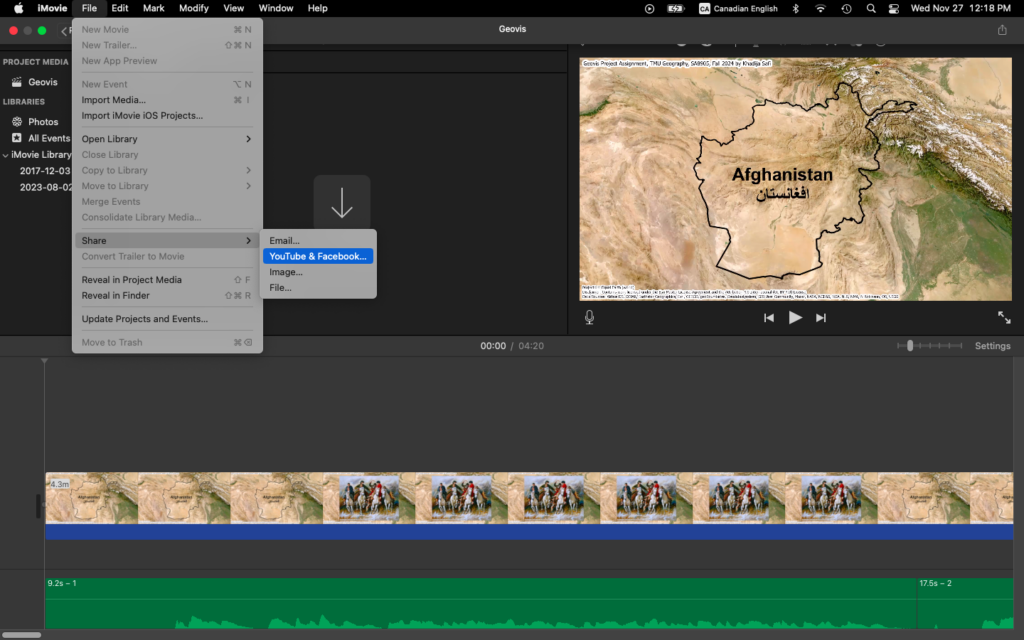
With my animation exported, I added the video to my project in iMovie. Since I timed the animation according to my narration, the two files aligned perfectly at the zero mark and no further editing had to be done.
To export the final video, I used File > Share > Youtube & Facebook and made sure to match the resolution to the one I selected in ArcGIS Pro (1920 x 1080). iMovie will notify you once the .mov file is exported.
Step 5: Upload the Animation on Youtube
The final step was uploading the video on Youtube.
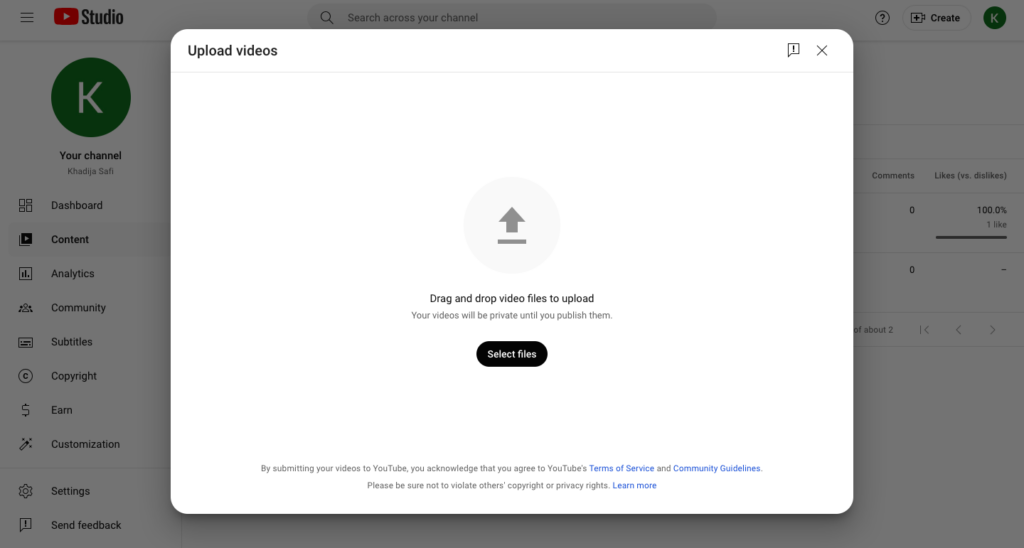
Create and/or log in to your Youtube account. On the Youtube homepage, click on You > Your videos > Content > Create > Upload videos to add the .mov file. A wizard will pop up.
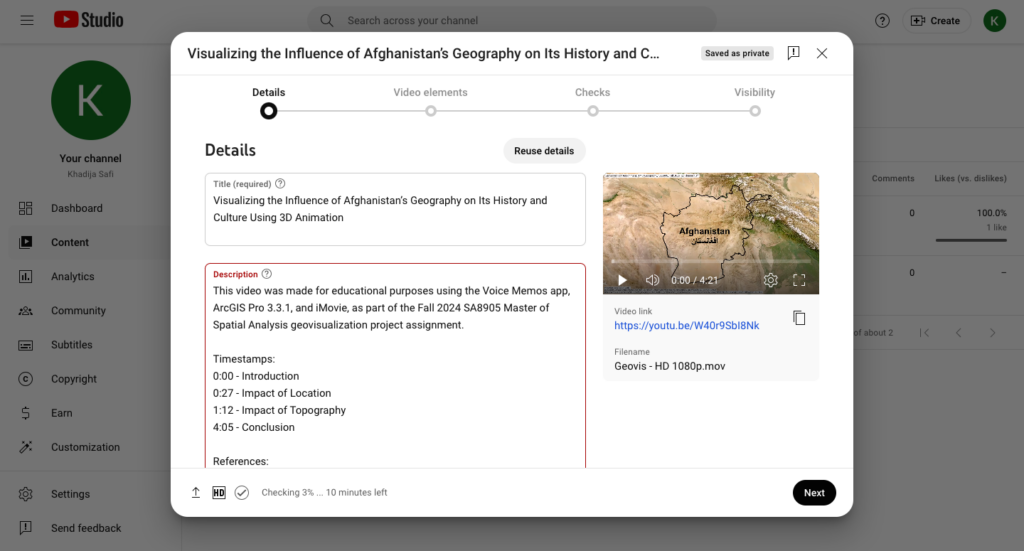
Under the Details tab, fill out the “Title” and provide a “Description” for your video. Timestamps marking different chapters in the video can also be added here.
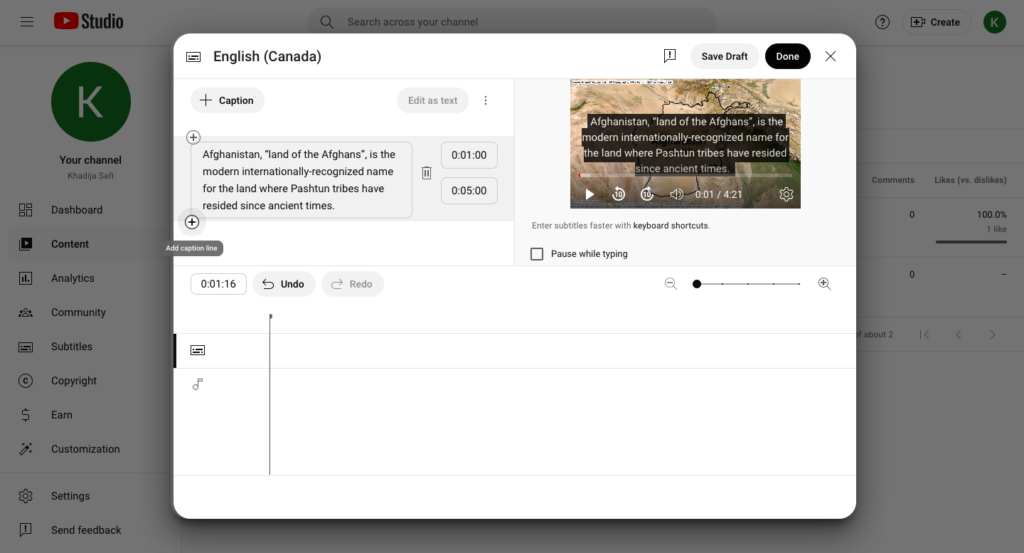
Select a thumbnail and fill out the remaining fields, including those under “Show more”, such as “Video language”. Selecting a “Video language” is necessary to add subtitles, which can be done through the Video elements tab.
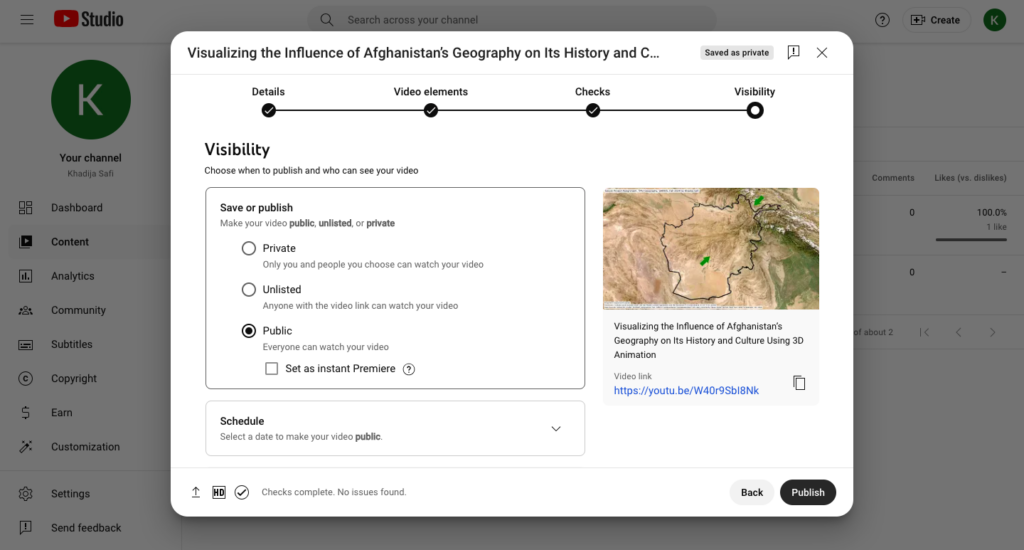
Once your video is set up, hit “Publish”. Youtube will supply you with the link to your published video.
Congratulations!
You just visualized 3D data and created a geographic-based animation using ArcGIS Pro!
References
Anonymous. (2014, September 18). Ahmad Shah Durrani [Artwork]. https://history-of-pashtuns.blogspot.com/2014/09/ahmed-shah-durrani.html
Esri, Maxar, Earthstar Geographics, & GIS User Community. (2024, November 19). World Imagery (November 26, 2024) [Tile layer]. Esri. https://services.arcgisonline.com/ArcGIS/rest/services/World_Imagery/MapServer
Jalali, A. A. (2021). Afghanistan: A Military History From the Ancient Empires to the Great Game. University Press of Kansas.
Khan, M. (2010, December 11). Horse [Artwork]. https://www.foundmyself.com/Momin+khan/art/horse/66007
Maxar, Airbus DS, USGS, NGA, NASA, CGIAR, GEBCO, N Robinson, NCEAS, NLS, OS, NMA, Geodatastyrelsen, & GIS User Community. (2024, June 12). World Elevation 3D/Terrain 3D (November 26, 2024) [Image service layer]. Esri. https://services.arcgisonline.com/arcgis/rest/services/WorldElevation3D/Terrain3D/ImageServer
Runfola, D., Anderson, A., Baier, H., Crittenden, M., Dowker, E., Fuhrig, S., Goodman, S., Grimsley, G., Layko, R., Melville, G., Mulder, M., Oberman, R., Panganiban, J., Peck, A., Seitz, L., Shea, S., Slevin, H., Youngerman, R., & Hobbs, L. (2020). GeoBoundaries: A Global Database of Political Administrative Boundaries (September 21, 2024) [Shapefile]. GeoBoundaries. https://www.geoboundaries.org