Mapping and Printing Toronto’s Socioeconomic Status Index in 3D

Menusan Anantharajah, Geovis Project Assignment, TMU Geography, SA8905, Fall 2025

Hello, this is my blog post!

My Geovis project will explore the realms of 3D mapping and printing through a multi-stage process that utilizes various tools. I have always had a small interest in 3D modelling and printing, so I selected this medium for the project. Although this is my first attempt, I was quite pleased with the process and the results.

I decided to map out a simplified Socioeconomic Status (SES) Index of Toronto’s neighbourhoods in 2021 using the following three variables:

  • Median household income
  • Percentage of population with a university degree
  • Employment rate

It should be noted that since these variables exist on different scales, they were standardized using z-scores and then scaled to a 0-100 range. The neighbourhoods will be extruded by the SES index value, meaning that neighbourhoods scoring high will be taller in height. I chose SES as my variable of choice since it would be interesting to physically visualize the disparities and differences between the neighbourhoods by height.

Data Sources

Software

A variety of tools were used for this project, including:

  • Excel (calculating the SES index and formatting the table for spatial analysis)
  • ArcGIS Pro (spatially joining the neighbourhood shapefile with the SES table)
  • shp2stl* (takes the spatially joined shapefile and converts it to a 3D model)
  • Blender (used to add other elements such as title, north arrow, legend, etc.)
  • Microsoft 3D Builder** (cleaning and fixing the 3D model)
  • Ultimaker Cura (preparing the model for printing)

* shp2stl would require an older node.js installation
** Microsoft 3D Builder is discontinued, though you can sideload it

Process

Step 1: Calculate the SES index values from the Neighbourhood Profiles

The three SES variables (median household income, percentage of population with a university degree, employment rate) were extracted from the Neighbourhood Profiles table. Using Microsoft Excel, these variables were standardized using z-scores, then combined into a single average score, and finally rescaled to a 0-100 range. I then prepared the final table for use in ArcGIS Pro, which included the identifiers (neighbourhood names) with their corresponding SES values. After this was done, the table was exported as a .csv file and brought over to ArcGIS Pro.

Step 2: Create the Spatially Joined Shapefile using ArcGIS Pro

The neighbourhood boundary file and the newly created SES table were imported into ArcGIS Pro. Using the Add Join feature, the two data sets were combined into one unified shapefile, which was then exported as a .shp file.

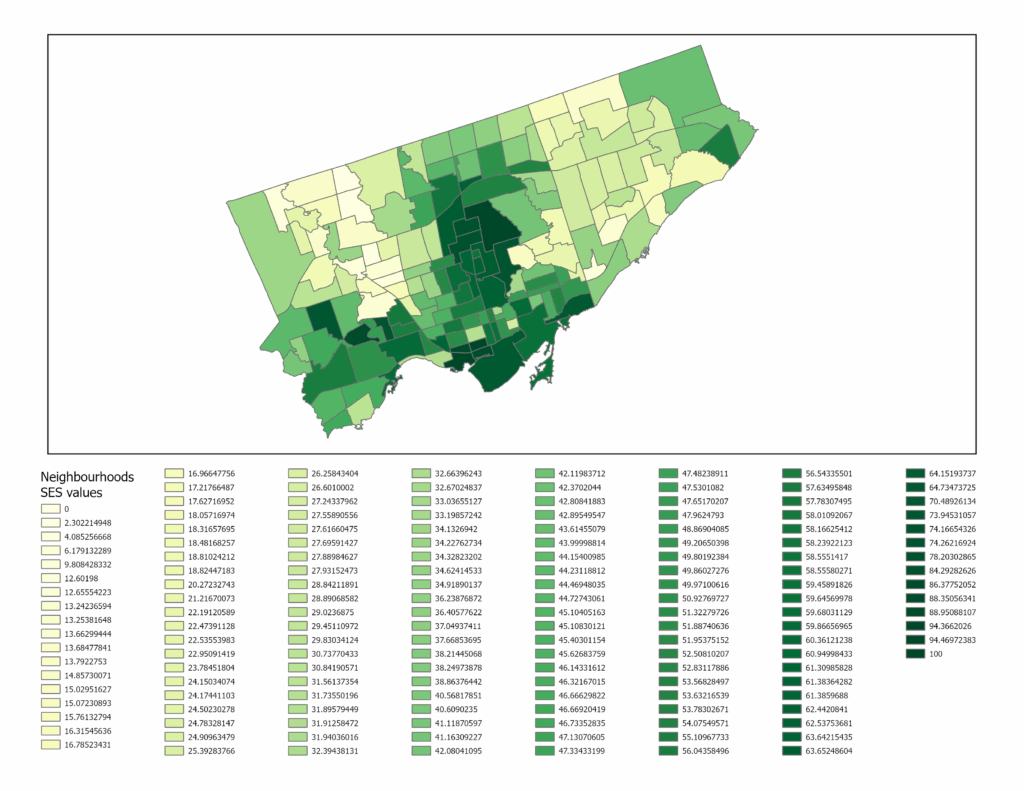
The figure above shows what the SES map looks like in a two-dimensional view. The areas with lighter hues represent neighbourhoods with low SES values, while the ones in dark green represent neighbourhoods with high SES values.

Step 3: Convert the shapefile into a 3D model file using shp2stl

Before using shp2stl, make sure that you have an older version of node.js (v11.15.0) and npm (6.7.0) installed. I would also recommend placing your shapefile in a new directory, as it can later be utilized as a Node project folder. Once the shapefile is placed in a new folder, you can open the folder in Windows Terminal (or Command Prompt) and run the following:

npm install shp2stl

This will bring in all the necessary modules into the project folder. After that, the script can be written. I created the following script:

const fs = require('fs');
const shp2stl = require('shp2stl');

shp2stl.shp2stl('TO_SES.shp', {
  width: 150,
  height: 25,
  extraBaseHeight: 3,
  extrudeBy: "SES_z",
  binary: true,
  verbose: true
}, function(err, stl) {
  if (err) throw err;
  fs.writeFileSync('TO_NH_SES.stl', stl);
});

This script was ‘compiled’ using Visual Studio Code; however, you can use any compiler or processor (even Notepad works). This script was then saved to a .js file in the project folder. The script was then executed in Terminal using this:
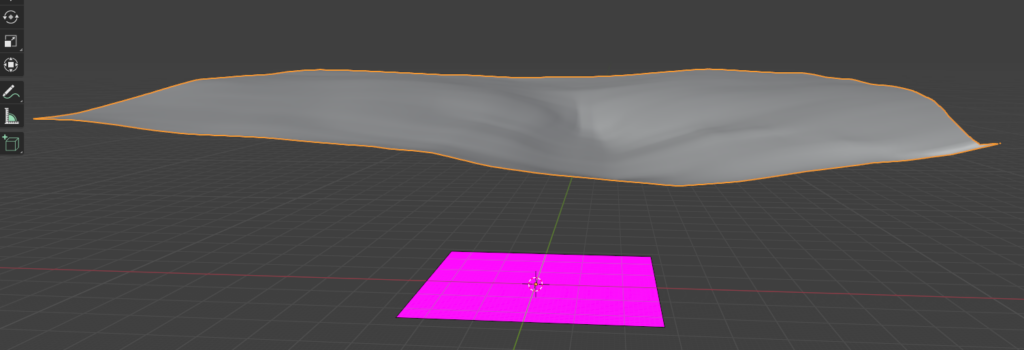
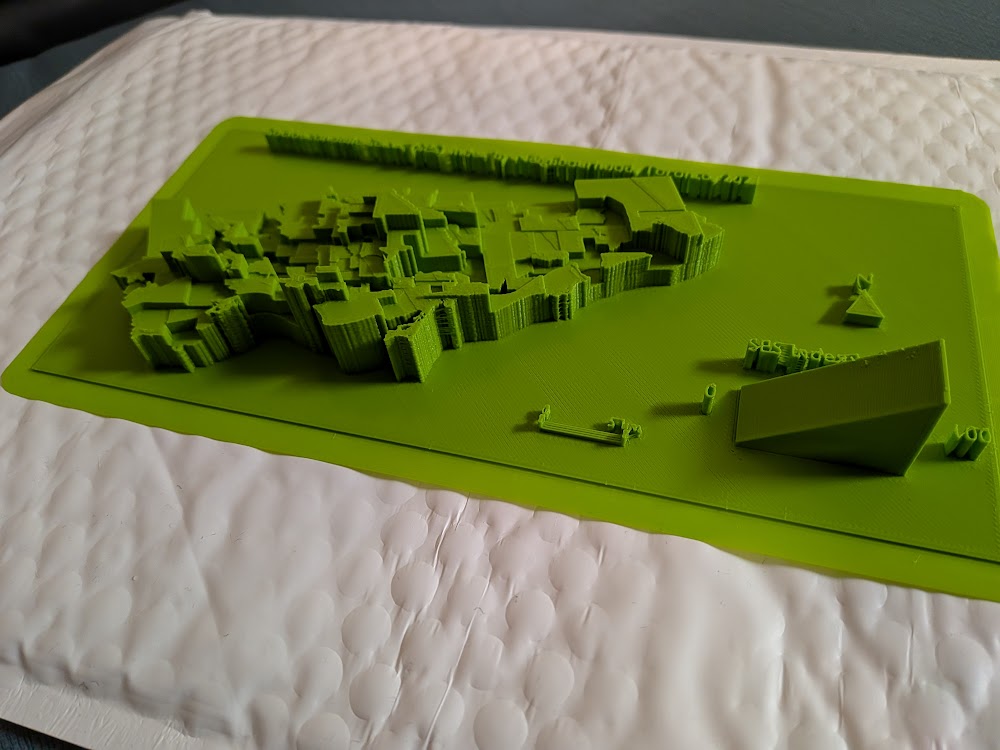
node shapefile_convert.js

The result is a 3D model that looks like this:

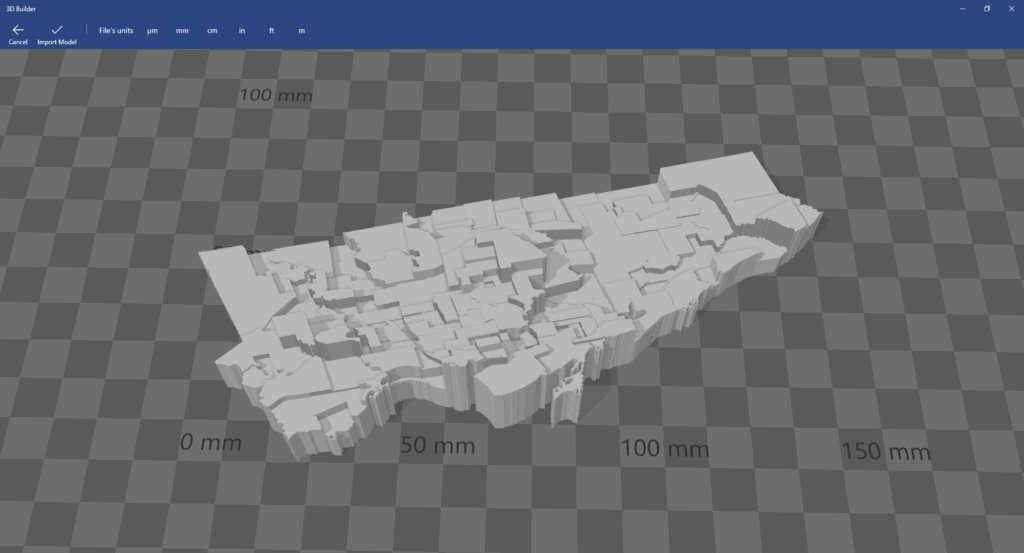
Since we only have Toronto’s neighbourhoods, we have to import this into Blender and create the other elements.

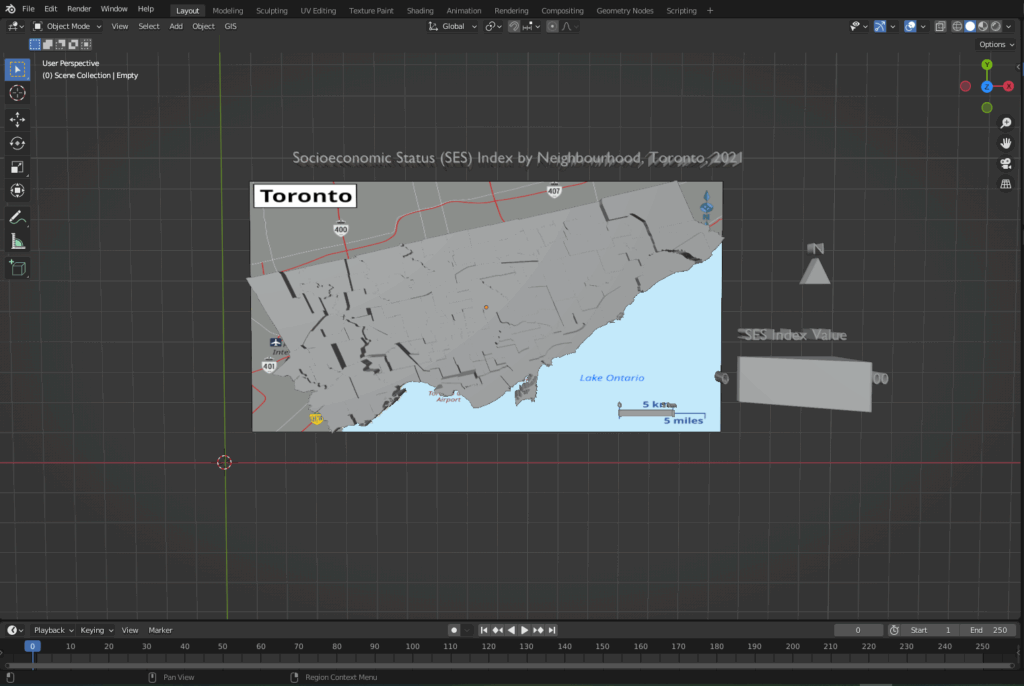
Step 4: Add the Title, Legend, North Arrow and Scale Bar in Blender

The 3D model was brought into Blender, where the other map elements were created and added alongside the core model. To create the scale bar for the map, the 3D model was overlaid onto a 2D map that already contained a scale bar, as shown in the following image.

After creating the necessary elements, the model needs to be cleaned for printing.

Step 5: Cleaning the model using Microsoft 3D Builder

When importing the model into 3D Builder, you may encounter this:

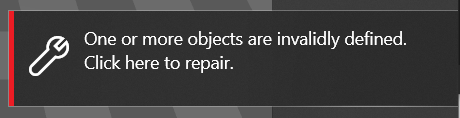
Once you click to repair, the program should be able to fix various mesh errors like non-manifold edges, inverted faces or holes.

After running the repair tool, the model can be brought into Ultimaker Cura.

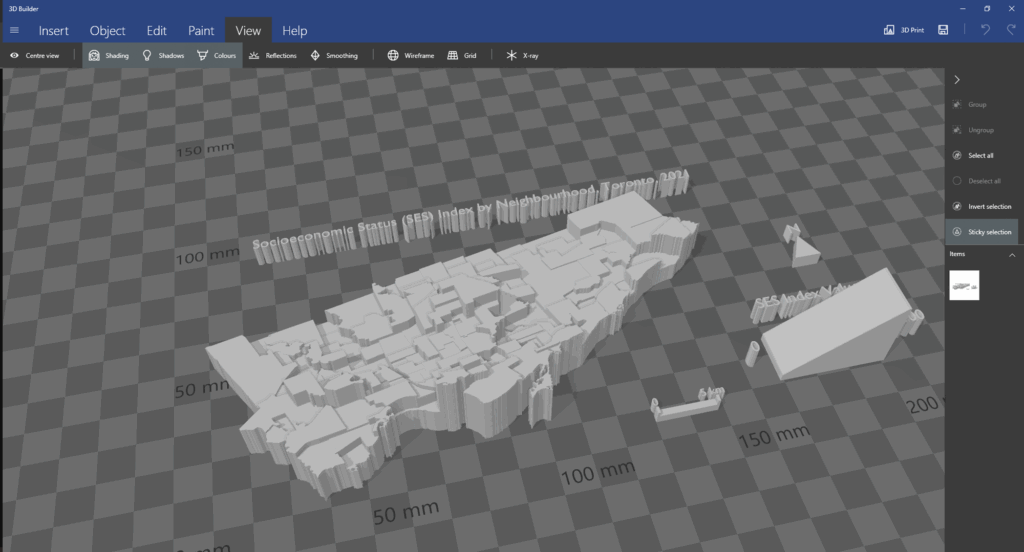
Step 6: Preparing the model for printing

The model was imported into Ultimaker Cura to determine the optimal printing settings. As I had to send this model to my local library to print, this step was crucial to see how the changes in the print settings (layer height, infill density, support structures) could impact the print time and quality. As the library had an 8-hour print limit, I had to ensure that the model was able to be printed out within that time limit.

With this tool, I was able to determine the best print settings (0.1 mm fine resolution, 10% infill density).

With everything finalized from my side, I sent the model over to be printed at the library; this was the result:

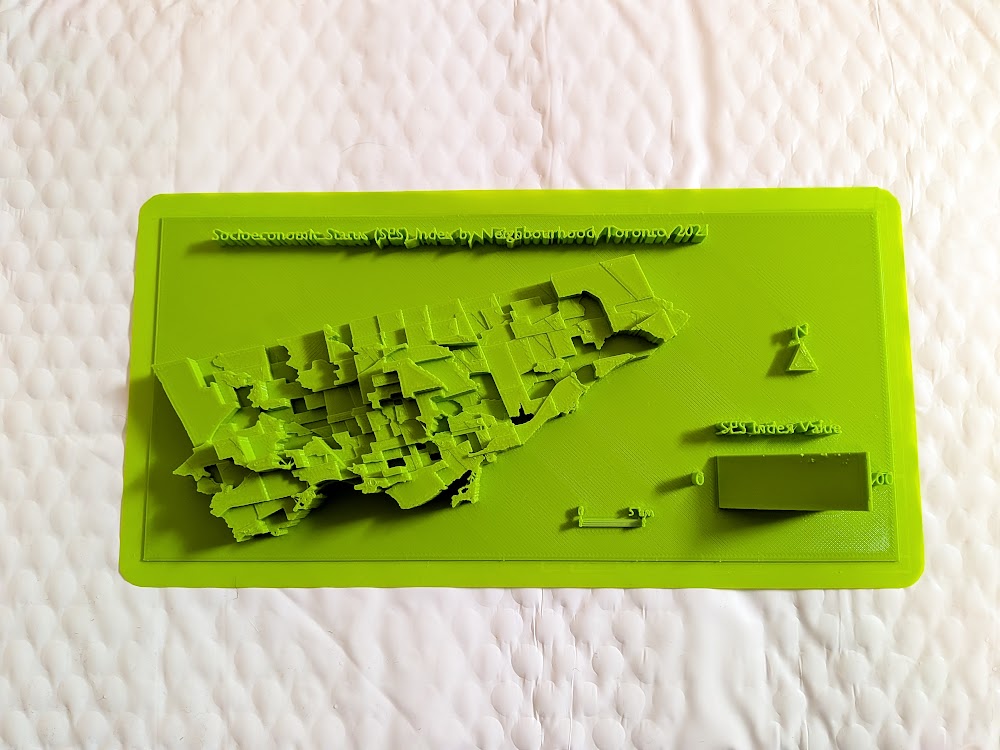
Overall, the print of the model was mostly successful. Most of the elements were printed out cleanly and as intended. However, the 3D text could not be printed with the same clarity, so I decided to print out the textual elements on paper and layer them on top of the 3D forms.

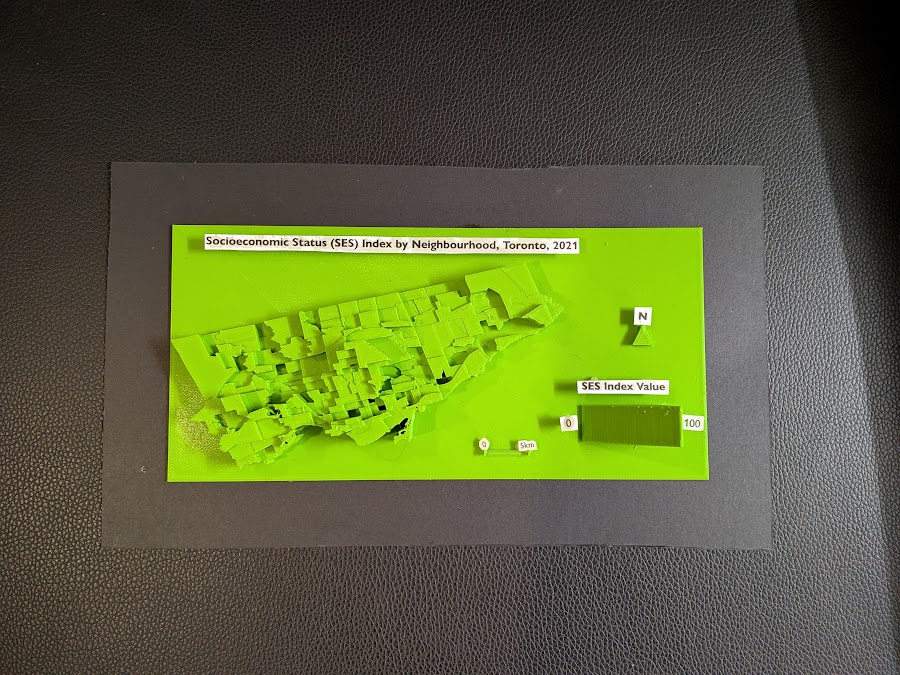
The following is the final resulting product:

Limitations

While I am still satisfied with the end result, there were some limitations to the model. The model still required further modifications and cleaning before printing; this was handled by the library staff at Burnhamthorpe and Central Library in Mississauga (huge shoutout to them). The text elements were also messy, which was expected given the size and width of the typeface used. One improvement to the model would be to print the elements separately and at a larger scale; this would ensure that each part is printed more clearly.

Closing Thoughts

This project was a great learning experience, especially for someone who had never tried 3D modelling and printing before. It was also interesting to see the 3D map highlighting the disparities between neighbourhoods; some neighbourhoods with high SES index values were literally towering over the disadvantaged bordering neighbourhoods. Although this project began as an experimental and exploratory endeavour, the process of 3D mapping revealed another dimension of data visualization.

References

City of Toronto. (2025). Neighbourhoods [Data set]. City of Toronto Open Data Portal. https://open.toronto.ca/dataset/neighbourhoods/ 

City of Toronto. (2023). Neighbourhood profiles [Data set]. City of Toronto Open Data Portal. https://open.toronto.ca/dataset/neighbourhood-profiles/

Visualizing select waterfalls of Hamilton, Ontario through 3D modelling using Blender and BlenderGIS

By: Darith Tran|Geovisualization Project Assignment|TMU Geography|SA8905|Fall 2024

Introduction/Background

The city of Hamilton, Ontario is home to many trails and waterfalls and offers many scenic and nature-focused areas. The city is situated along the Niagara Escarpment, which allows for unique topography and is the main reason for the high frequency of waterfalls that exist across the city. Hamilton is dubbed as the waterfall capital of the world, being home to over 100 waterfalls within the city’s boundaries. Despite this, Hamilton is still under the radar for tourists as it sits between 2 other major cities that see higher tourist traffic such as Niagara Falls (which is home to one of the world’s most known waterfall) and Toronto (popular for the CN Tower and hustle bustle city atmosphere).

The main purpose of this project was to increase awareness for the beauty of the Southern Ontario wonder and to provide prospective visitors, or even citizens of Hamilton, with an interactive story map to provide some general information on the trails connected to the waterfalls and the details of the waterfalls themselves. The 3D modelling aspect of the project aims to provide a unique visualization of how the waterfalls look in order to provide a quick, yet creative visual for those looking into visiting the city to see the waterfalls in person.

Data, Processing and Workflow (Blender + OpenTopography DEMs)

The first step of this project was to obtain DEMs for the regions of interest (Hamilton, Ontario) to be used as the foundation of the 3D model. The primary software used for this project was Blender (a 3D modeling software) leveraged by a GIS oriented plugin called “BlenderGIS” which is direct plugin available created by GitHub user domlysz allowing users to directly import GIS related files and elements such as shapefiles and base maps into the Blender editing and modelling pane. The plugin also allows users to load and access DEMs straight into Blender to be extracted and edited sourced through OpenTopography.

The first step is to open Blender and navigate towards the GIS tab in the object mode in the application :

Under the GIS tab, there are many options and hovering over “web geodata” prompts the following options:

In this case, we want to start off with a base map and the plugin has many sources available including the default Google Maps, ESRI Base maps as well as OpenStreetMap (Google Satellite was used for this project)

Once the base map is loaded into the Blender plane, I zoomed into the area of interest #1, being the Dundas Peak region, which is home to both Tew’s Falls and Webster’s Falls. The screenshot below shows the 2D image of Tew’s Falls in the object plane:

Once an area of interest is defined and all information is loaded, the elevation model is requested to generate the 3D plane of the land region:

The screenshot above shows the general 3D plane being created from a 30m DEM extracted from OpenTopography through the BlenderGIS plugin. The screenshot below showcases the modification of the 3D plane through the extrusion tool which adds depth and edges to create the waterfall look. Below is the foundation used specifically for Tew’s Falls.

Following this, imagery from the basemap was merged with the 3D extrusted plane to produce a the 3D render of the waterfall plane. To add the waterfall animation, the physics module was activated, allowing for various types of motion to be added to the 3D plane. Fluid was selected with the outflow behavior to simulate the movement of water coming down from a waterfall. This was then overlayed onto the 3D plane of the waterfall to simulate water flowing down from the waterfall.

These steps were then essentially repeated for Webster’s Falls and Devil’s Punchbowl waterfalls to produce 3D models with waterflow animations!

Link to ArcGIS Story Map: https://arcg.is/05Lr8T

Conclusion and Limitations

Overall, I found this to be a cool and fun way to visualize the waterfalls of Hamilton, Ontario and adding the rendered product directly onto ArcGIS Story Maps makes for an immersive experience. The biggest learning curve for this project was the use of the application Blender as I have never used the software before and have only briefly explored 3D modelling in the past. Originally, I planned to create 10 renders and animations of 10 waterfalls in Hamilton however, this became a daunting task after realizing the rendering and export times after completing the 3 models shown in the Story Map. Additionally, the render quality was rather low since 2D imagery was interpolated into a 3D plane which caused some distortions and warped shapes which would require further processing.

Developing a 3-Dimensional Model of the Everest Region in Nepal Using Blender

By Matthew Abraham for SA8905 Geovis course project (Dr. Rinner)

This Geovisualization project developed a working 3D model of the Sagarmatha region using graphics and animation software, Blender, culminating in a fly-through of the region outlining all mountains above 8,000m. The purpose of this blog is to detail the steps needed to develop a 3D model of any desired region around the world, using Blender, and is therefore not limited to this one example.

Blender is a free open-source graphics and animation program that has many uses beyond what was explored in this project. Many of their open film projects can be seen on their website at https://www.blender.org/features/projects/. Since this program has incredible diversity in its applications and can create photorealistic imagery, I chose it to produce a 3D mapped mountain environment of the Everest region in Nepal, combining both graphic design and geospatial data. It should be noted that this entire project was done in Blender Cycles (a version of Blender).Technology Blog Pics

This process from geography to 3D model included four critical steps and involved two core programs. The steps were:

  1. Collect geospatial data and identify the size of the region analyzed;
  2. Process this geospatial data within a geographic information system (GIS) – Quantum GIS;
  3. Convert the map to a 3D model using Blender – an open-source graphics animation program; and
  4. Process and develop a fly-through of the desired mountains.

The first step involved extracting digital elevation model (DEM) data from the US Geological Survey website, using http://earthexplorer.usgs.gov/ to define the region of interest. Using a simple search for Mount Everest on Earth Explorer, the region was pulled up. Once the region was located, multiple points were used to help define the regions of interest for data acquisition. Once the region was selected, ASTER DEM data was pulled for all four Lat/Long regions identified by Earth Explorer.

Technology Blog pic 2

After downloading the DEM data, it was uploaded into QGIS to merge and crop the four DEM layers to develop the zone of interest. Raster –> Miscellaneous –> Merge was used in order to combine the underlying four DEM layers into one crop-able sheet. Next, a Raster Clipper tool was used to select the desired region from the merged DEM layer as shown below. This clipped section was saved as a TIFF file to be imported into Blender.

Technology Blog pic 3

Once the desired DEM region was converted into a TIFF file, the work could begin in Blender. Upon opening up an empty project in Blender, the user is given an empty canvas with a cube in the center of the 3D matrix as seen here:

Technology Blod pic 3

The first step involved deleting the cube by pressing X and then clicking “delete”. Next, it was necessary to bring in a blank plane to display the geospatial data. This was done by using the shortcut, Shift-A, and then selecting under Mesh –> Plane. This produced a blank plane in the centre of the grid, where the cube was located.

Tech Blog pic 5

The next step was to subdivide the plan into multiple grids. This was done in the Edit Mode by hitting tab and then scrolling down in the Transform sidebar to Subdivide. Subdivide breaks the plane down into as many smaller planes as desired, however the more subdivisions there are, the more information and challenge it is for your computer to handle the detail. For the purpose of this assignment and the limitations of my computer, 500 subdivisions were made to the plane creating over 250,000 squares and 370,000 vertices.

Once the plane was subdivided, the plane was scaled up to a more appropriate size. In order to make it easier to scale up, units were given to the plane by going to the Scene tab and changing the units to “Metric”. In the Transform sidebar, the plane was scaled up to 500 by 500 meters. Although this is not the actual scale of the DEM region we are looking at, it provide enough size and detail to appropriately map the desired region.

After the plane as set up and given an appropriate scale, it was necessary to import the geospatial data onto this plane. This was done by going to the Modifier tab and then selecting a “Displace” modifier from the pull-down menu. Click “New Texture”, and then under Type select “Image or Movie”. Under image, select the TIFF file saved earlier.

pic8Tech Blog 7

The plane at this point will not show the features, mainly due to the strength of the displacement. This can be adjusted by going back to the Modifier tab and changing the strength of the displace modifier. The strength can be adjusted until the desired look is achieved. It was also necessary to adjust the Z-axis location to be half of the displaced value in order to account for the displacement effects. The following was the result:

Tech Blog pic 6

The next step was adding texture to this terrain to give it some realistic definition and colouring. There are multiple methods for texturing in Blender. One step explored in this project was the use of a colour ramp based on vertical height. This was all done in the Node Editor and involved multiple nodes. This first node was a Texture Coordinate, which tells Blender what object the colours will apply to. In this case “Generated” was selected, as it would automatically generate the colours on the desired object. Next a Separate XYZ node was used to separate the desired Z-axis to create a vertical layering of the selected colours. After separating the Z-axis, a Mapping node was added to help further identify the locations of the colours on the object, specifying the Z-axis under Texture. Next a Gradient Texture was used alongside a ColorRamp node to develop the desired colour ranges for the 3D plane. Colours were chosen based on personal examination of the mapped region, going from a dark green and brown for low-lying forests to white for snow-capped peaks. This is all part of a Diffuse BSDF, which is a tool that creates the material for the desired plane. The resulting rendered image shows how the colour ramp looks on the 3D plane.

Pic9

Pic10

The second last thing to add prior to creating the fly-through was the sky texture, which was done by simply going to the World tab and under Surface and selecting “Background” –> “Sky Texture”. The intensity of the Sun and location can be altered using the provided Vector and Colour mapping options. For this project, Ambient Occlusion was turned on as it added more realism to the lighting of the 3D plane.

Lastly, text was added to the map to identify the four mountains above 8,000 meters. This was done through Shift-A, and selecting “Text”. The scale of the text was adjusted using the same method as done for the plane. Next, the text was given 3-dimensions through the Depth option, and the appropriate text was written in Edit Mode. This was then rotated and moved to a location on the 3D model as shown here:

Pic 11

Once the map was ready, I added camera animations to fly-through the mountains. This was done by first creating a path for the camera to rest on. Once again, this was accessed by pressing Shift-A, going to Curve, and selecting “Path” at the bottom. The desired path can then be scaled and shaped by moving the XYZ vector points of the line.

Pic 12

Once this path was adjusted to the appropriate location, I added a Follow Path object constraint to the camera under the Constraints tab. After adding the constraint, change Forward direction to “–Z”, and Up to “Y”. In addition to fixing the camera’s orientation, I defined the position on the path by pressing “I” on Offset at “0.000”. Next, I went to Video Sequence view and moved the current frame to the desired end frame (in this case 1600) and then changed the Offset value to “1.000” and once again pressed “I”. This sets the end of the path of the camera at the end frame, 1600.

Next it was necessary to add an Empty object that the camera can track throughout the animation. Once again, Shift-A was used to select “Empty” and then “Plain Axis”. Another object constraint needed to be added to the camera, this time a Track To constraint, which used the same Forward as “–Z” and Up as “Y”. The camera should now be on the path created and pointed at the plain axis. This plain axis could be positioned at any desired region on the map.

Pic 13

For this project I put this plain axis near the peak of the first mountain and moved it throughout the animation. For each movement, the plain axis was selected at a desired frame by pressing “R” and selecting “Location”. The object was then moved to the second mountain and the frame was adjusted to approximately 200 frames later. Once again, the plain axis was selected by pressing “R” and selecting “Location”. This identified that the camera needed to move to the new location of the plain axis, giving it 200 frames to do so. This process was done twice more to capture the remaining mountains.

At this point it was possible to animate the camera fly-through. In order to do so, a few minor things needed to be done in the Render Tab, including defining the desired resolution (1080p in this example), setting the Start and End Frame to 1 and 1600 respectively, making the Frame Rate 24 frames per second, and choosing an output type. The project was first rendered as pictures or .png files because if the render process crashed, you would be able to continue rendering from the individual picture frame it crashed at. In addition, under Sampling, the samples were increased to help reduce any picture noise caused by light scattering. “Render Animation” was then clicked after all the settings were finalized. The rendering process varies in length and depends on the number of samples, detail of the images, and number of frames. For this project, the render took around 4 hours.

Pic 14Pic 15


After the rendering process was complete it produced 1600 individual pictures, which were loaded into Blender’s Video Sequence Editor by locating the folder the render output was saved in and selecting all the image frames. Once uploaded into the Video Sequence Editor, the output type was changed from a .png image to an h.264 file, which is a video output. “Lossless Output” was also selected, and is found under Encoding. Lossless Output ensures that there is no compression in the photos between the original frame and the new video output. This produced the video file of the entire project.

Pic 16         This example demonstrated how to create a 3D model of the Sagarmatha region in Nepal and create a detailed fly-through of the region using the graphics and animation program Blender. This same process can be applied to anywhere in the world with DEM data.

Pic 17

Thanks for Reading!